How to Make a Wire Wreath Frame from a Hanger
You can buy all sorts of forms, frames and bases so that you can make your very own DIY wreath but it's really a whole lot more satisfying to make your own and especially if you can make your own by using or re-purposing an item that you have readily available already in the home.
Most of us have wire clothes hangers readily available to use and these are perfect to make your own rings with for making a wreath. I’ll show you how with the step by step photos, details and tips below.
My favorite way to make frames or bases is to use cardboard since I tend to have lots of this ready to use at any given time. However the big downside with that material is that it's a lot more perishable and not as durable (if it gets damp or wet particularly) as using a material such as wire.
Note: This post may contain affiliate links for which I can be compensated.

Wire from wire clothes hangers tends to be pretty durable to use as a wreath base. The wire can be used more successfully in outdoor locations although, do be aware, it may rust after a long period of exposure to the elements. This wire also happens to be nice and sturdy.

Image Credit: photo belongs to the author.
Step 1: The first thing that you need to do is to snip off the very top of the hanger – the bit that normally hangs over the bar in your closet or walk in wardrobe.
You need to snip just below the twisted section in the neck with a pair of very strong wire cutters and maybe some brute force too.

Image Credit: photo belongs to the author.
Step 2: Cut the neck portion of the hanger off completely so you are just left with a triangular piece of wire.

Image Credit: photo belongs to the author.
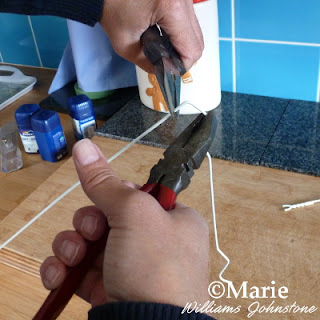
Step 3: The wire from hangers can be pretty tough to bend which is good because it is normally nice and sturdy to form a base but not so good when trying to bend it into a circular shape.
You may need to use two pairs of pliers or grips to pull the wire into shape. The easiest way we found was to try to completely straighten the wire out first and remove the kinks as much as possible.

Image Credit: photo belongs to the author.
Step 4: Once you have a straight section of wire, you may want a bowl or something round to help you to bend it into a circular shape to make the wreath form. Depending how thick it is, this can be hard or easy.

Image Credit: photo belongs to the author.
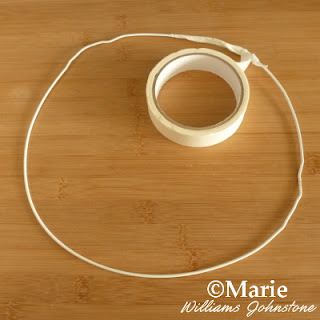
Step 5: You can see on this example that it’s not perfectly round. For what I had in mind for decorating this frame with, that was not an issue. You may want to spend longer working on getting kinks out and making a rounder shape.
You twist the two raw or cut ends of the wire around each other to join them and can wrap those sharp edges over with some tape. I used masking tape but you could use a packing tape.

Image Credit: photo belongs to the author.
Step 6: A single wire frame is fine for decorating like I have above by wrapping strips of tulle netting around it.
See How to Wrap Tulle on Your Wreath with My Tutorial
In some cases, you might want a double wreath frame which is also possible by making another circle of wire either slightly bigger or smaller and joining it up with the first one by twisting small pieces of wire or even a material such as gardening twist ties to join both rings up and hold them together.
A double frame can be decorated in other ways such as wrapping fabric or material round the whole ring or knotting fabric strips around it. There are lots of options.
As well as making these particular wreath frames, you can also easily make them from cardboard too which I show you with a step by step tutorial. Enjoy making your own wreath. If you don't have time or don't want to make your own after seeing this - there are some ready made versions below instead.
Related Content You Should Also Love:
Page Last Updated:
Most of us have wire clothes hangers readily available to use and these are perfect to make your own rings with for making a wreath. I’ll show you how with the step by step photos, details and tips below.
My favorite way to make frames or bases is to use cardboard since I tend to have lots of this ready to use at any given time. However the big downside with that material is that it's a lot more perishable and not as durable (if it gets damp or wet particularly) as using a material such as wire.
Note: This post may contain affiliate links for which I can be compensated.
How to Make a Wire Wreath Frame from a Wire Clothes Hanger

Wire from wire clothes hangers tends to be pretty durable to use as a wreath base. The wire can be used more successfully in outdoor locations although, do be aware, it may rust after a long period of exposure to the elements. This wire also happens to be nice and sturdy.

Image Credit: photo belongs to the author.
Step 1: The first thing that you need to do is to snip off the very top of the hanger – the bit that normally hangs over the bar in your closet or walk in wardrobe.
You need to snip just below the twisted section in the neck with a pair of very strong wire cutters and maybe some brute force too.

Image Credit: photo belongs to the author.
Step 2: Cut the neck portion of the hanger off completely so you are just left with a triangular piece of wire.

Image Credit: photo belongs to the author.
Step 3: The wire from hangers can be pretty tough to bend which is good because it is normally nice and sturdy to form a base but not so good when trying to bend it into a circular shape.
You may need to use two pairs of pliers or grips to pull the wire into shape. The easiest way we found was to try to completely straighten the wire out first and remove the kinks as much as possible.

Image Credit: photo belongs to the author.
Step 4: Once you have a straight section of wire, you may want a bowl or something round to help you to bend it into a circular shape to make the wreath form. Depending how thick it is, this can be hard or easy.

Image Credit: photo belongs to the author.
Step 5: You can see on this example that it’s not perfectly round. For what I had in mind for decorating this frame with, that was not an issue. You may want to spend longer working on getting kinks out and making a rounder shape.
You twist the two raw or cut ends of the wire around each other to join them and can wrap those sharp edges over with some tape. I used masking tape but you could use a packing tape.

Image Credit: photo belongs to the author.
Step 6: A single wire frame is fine for decorating like I have above by wrapping strips of tulle netting around it.
See How to Wrap Tulle on Your Wreath with My Tutorial
In some cases, you might want a double wreath frame which is also possible by making another circle of wire either slightly bigger or smaller and joining it up with the first one by twisting small pieces of wire or even a material such as gardening twist ties to join both rings up and hold them together.
A double frame can be decorated in other ways such as wrapping fabric or material round the whole ring or knotting fabric strips around it. There are lots of options.
As well as making these particular wreath frames, you can also easily make them from cardboard too which I show you with a step by step tutorial. Enjoy making your own wreath. If you don't have time or don't want to make your own after seeing this - there are some ready made versions below instead.
Related Content You Should Also Love:
Make a Cardboard Wreath Form Tutorial
DIY Indoor Tulle Wreath to Make for Halloween
Making Deco Mesh Wreaths for Outdoors
More Halloween Wreath Ideas
More Halloween Craft Tutorials
DIY Indoor Tulle Wreath to Make for Halloween
Making Deco Mesh Wreaths for Outdoors
More Halloween Wreath Ideas
More Halloween Craft Tutorials
Page Last Updated:


Comments
Post a Comment
Just Halloween Crafts is a site dedicated to my favorite time of year and the whole spook time season that surrounds October 31st. I love to decorate the home with handmade, DIY and crafted items for Halloween as well as make costume accessories and do fun crafting activities. Using papercrafts, sewing with felt, no-sew techniques and more, you can create a wonderful scheme to your decor whether you are going for scary themes or more fun ones with pumpkins and more. Ghosts, witches, wizards and more make for fun crafting sessions. Thanks for leaving me a comment. Comments do not show until I approve them. Marie