How to Tie Tulle around a Wreath Ring
Making your own wreaths for occasions such as Thanksgiving, Christmas, Fall, birthdays and other events and themes is really easy once you understand how it is that you can tie or attach the tulle netting fabric to your base or frame.
No matter which style of base you have for your handmade wreath – the basic principle of tying your tulle strips on remains exactly the same. You’ll learn how this is done with these step by step photos below.
Your base can be as simple and inexpensive as a circle frame cut from a thick piece of cardboard (packaging such as Amazon boxes make a nice, sturdy choice) or they might be a wire frame that you’ve made yourself or bought ready-made or even a styrofoam one.
Note: This post may contain affiliate links for which I can be compensated.

A note on fabric and sizes of strips: Tulle netting makes an ideal fabric to choose for your indoor decorations or even carefully used outdoor ones providing the weather is dry and that they are not left out overnight. If you need more robust fabric specifically for outdoor wreaths, choose to buy some deco mesh for outdoor use instead for this purpose.
The strips I use are a minimum size of 2 inches wide x 15 inches long. You may prefer to use wider strips just as they are straight from the spool and these would likely be around 3-6 inches wide. If you are using wider strips, you can fold them in half width ways very easily. 15 inches is rather short and will work around a thin frame but not a very wide one.
Before cutting lots of strips all to the same size, I recommend starting with my minimum recommended length of 15 inches. First test this size out to see whether you want to cut strips longer than this for wrapping your own particular wreath base or frame.

Image Credit: photo belongs to the author.
Step 1: now I'm going to walk you through tying strips onto a frame. You can see I'm using a cardboard frame and the principle is the same whether you use a material like this that can be reused or whether you choose a frame like a wire or styrofoam one instead.
🎃 See How to Make Your Own Cardboard Wreath Frame Here
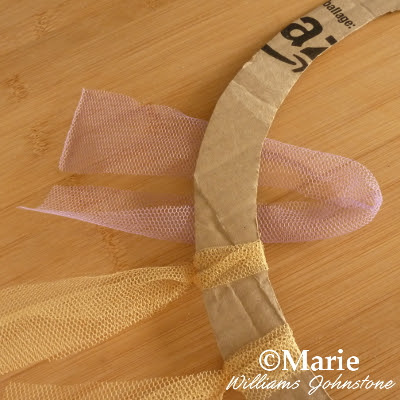
Lay your frame on a flat surface in front of you. Take a strip of tulle netting and fold it in half length ways. With the folded section facing to the right, pass this under the left side of the frame as shown in the photo above.
Double check that your strip looks similar to this one with how it is positioned. The folded middle should be in the center of the wreath frame and the longer ends should be off on the other side to the left.

Image Credit: photo belongs to the author.
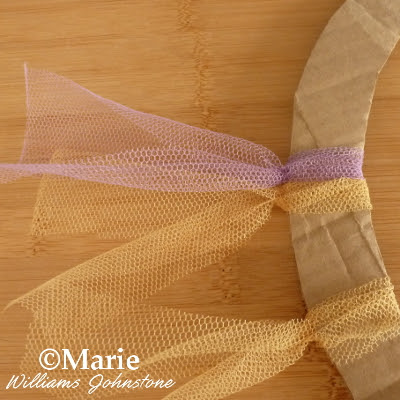
Step 2: grab hold of the ends of the strip on the left with your left hand and the folded end of the strip on the right with your right hand.
Now pass the 2 ends of the strip on the left through the folded end on the right. Your tulle strip should look similar to the photo above at this point.

Image Credit: photo belongs to the author.
Step 3: now carefully pull on the ends of the strip, pulling them up and off to the left and the outside edge of your frame. What this does is to pull a very neat looking unsecured knot into the netting on the outer edge of the wreath. In most cases this works fine as it is and the fabric will hold beautifully.
Should you need to secure this knot if the fabric is not gripping the frame nice and tautly, you can either take both ends of the strip and make a double knot.
That will make this knotted area look much bulkier or you can use a glue gun to secure the knotted part of the fabric on the wrong side or the underside of the wreath.

Image Credit: photo belongs to the author.
Step 4: once you understand the tying process, you simply add on more strips in the exact same way until you cover the whole frame.
It is easier when you first start to turn the base round as you add on more strips so that you are always working in the exact same way on the left side of the frame.

Image Credit: photo belongs to the author.
Step 5: I recommend using more than one color. One color around the whole thing can look quite flat and boring.
2-5 colors that all look good together can make a more professional looking design and one that doesn’t necessarily look homemade. If you are adding on several colors, it helps to spread them evenly out around the base as shown.

Image Credit: photo belongs to the author.
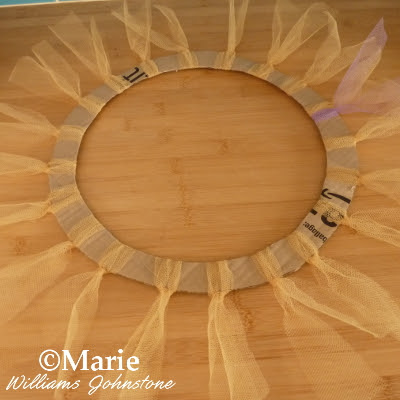
Step 6: keep adding on strips until you can no longer see through to the base or the frame of the wreaths design. It should end up looking something like the photo above. Once all the strips are added, you can decorate it further.
Related Content You Should Also Love:
Page Last Updated:
No matter which style of base you have for your handmade wreath – the basic principle of tying your tulle strips on remains exactly the same. You’ll learn how this is done with these step by step photos below.
Your base can be as simple and inexpensive as a circle frame cut from a thick piece of cardboard (packaging such as Amazon boxes make a nice, sturdy choice) or they might be a wire frame that you’ve made yourself or bought ready-made or even a styrofoam one.
Note: This post may contain affiliate links for which I can be compensated.
How to Tie Tulle Netting Around a Wreath Ring

A note on fabric and sizes of strips: Tulle netting makes an ideal fabric to choose for your indoor decorations or even carefully used outdoor ones providing the weather is dry and that they are not left out overnight. If you need more robust fabric specifically for outdoor wreaths, choose to buy some deco mesh for outdoor use instead for this purpose.
The strips I use are a minimum size of 2 inches wide x 15 inches long. You may prefer to use wider strips just as they are straight from the spool and these would likely be around 3-6 inches wide. If you are using wider strips, you can fold them in half width ways very easily. 15 inches is rather short and will work around a thin frame but not a very wide one.
Before cutting lots of strips all to the same size, I recommend starting with my minimum recommended length of 15 inches. First test this size out to see whether you want to cut strips longer than this for wrapping your own particular wreath base or frame.

Image Credit: photo belongs to the author.
Step 1: now I'm going to walk you through tying strips onto a frame. You can see I'm using a cardboard frame and the principle is the same whether you use a material like this that can be reused or whether you choose a frame like a wire or styrofoam one instead.
🎃 See How to Make Your Own Cardboard Wreath Frame Here
Lay your frame on a flat surface in front of you. Take a strip of tulle netting and fold it in half length ways. With the folded section facing to the right, pass this under the left side of the frame as shown in the photo above.
Double check that your strip looks similar to this one with how it is positioned. The folded middle should be in the center of the wreath frame and the longer ends should be off on the other side to the left.

Image Credit: photo belongs to the author.
Step 2: grab hold of the ends of the strip on the left with your left hand and the folded end of the strip on the right with your right hand.
Now pass the 2 ends of the strip on the left through the folded end on the right. Your tulle strip should look similar to the photo above at this point.

Image Credit: photo belongs to the author.
Step 3: now carefully pull on the ends of the strip, pulling them up and off to the left and the outside edge of your frame. What this does is to pull a very neat looking unsecured knot into the netting on the outer edge of the wreath. In most cases this works fine as it is and the fabric will hold beautifully.
Should you need to secure this knot if the fabric is not gripping the frame nice and tautly, you can either take both ends of the strip and make a double knot.
That will make this knotted area look much bulkier or you can use a glue gun to secure the knotted part of the fabric on the wrong side or the underside of the wreath.

Image Credit: photo belongs to the author.
Step 4: once you understand the tying process, you simply add on more strips in the exact same way until you cover the whole frame.
It is easier when you first start to turn the base round as you add on more strips so that you are always working in the exact same way on the left side of the frame.

Image Credit: photo belongs to the author.
Step 5: I recommend using more than one color. One color around the whole thing can look quite flat and boring.
2-5 colors that all look good together can make a more professional looking design and one that doesn’t necessarily look homemade. If you are adding on several colors, it helps to spread them evenly out around the base as shown.

Image Credit: photo belongs to the author.
Step 6: keep adding on strips until you can no longer see through to the base or the frame of the wreaths design. It should end up looking something like the photo above. Once all the strips are added, you can decorate it further.
Related Content You Should Also Love:
Make a Witch Wreath Design for Halloween
How to Make a DIY Tulle Wreath
Turn a Wire Hanger into a Wreath Form
How to Make a DIY Cardboard Wreath Form or Base
More About Halloween Wreaths
How to Make a DIY Tulle Wreath
Turn a Wire Hanger into a Wreath Form
How to Make a DIY Cardboard Wreath Form or Base
More About Halloween Wreaths
Page Last Updated:


Comments
Post a Comment
Just Halloween Crafts is a site dedicated to my favorite time of year and the whole spook time season that surrounds October 31st. I love to decorate the home with handmade, DIY and crafted items for Halloween as well as make costume accessories and do fun crafting activities. Using papercrafts, sewing with felt, no-sew techniques and more, you can create a wonderful scheme to your decor whether you are going for scary themes or more fun ones with pumpkins and more. Ghosts, witches, wizards and more make for fun crafting sessions. Thanks for leaving me a comment. Comments do not show until I approve them. Marie