Easy How to Make a Tulle Wreath for Halloween
Tulle wreaths are easy for most people to have a go at making and they can be made in a matter of hours too. See how easy it is to make a tulle wreath for Halloween that you can display.
This fabric is a stiffer netting which makes it ideal since it will stand vertically and not just flop down as most fabrics would. It's ideal to use this netting for any decorations that you will use certainly indoors.
Tulle can be used outdoors on a fine day but remember to bring it inside overnight as damp will not benefit it at all. You are better off using a unique and much stiffer material called Deco Mesh for items that you want to place outdoors and that's because it's more weatherproof.
Note: This post may contain affiliate links for which I can be compensated.

Come see how to make this fun design which you can hang up inside your home for a frightful Halloween.
Here's What You Need to Make This Tulle Wreath for Halloween:

Step 1: First you need a wreath base. I made a wire one for this project although I actually prefer using cardboard ones.
You can buy wreath bases and frames to use usually from wire or styrofoam although I prefer to make mine for no cost from whatever I have to hand. Here's my tutorials on making your own base to use:
🎃 How to make a DIY cardboard wreath base
You make your frame the size that you want it. It really depends where you plan to hang it up and whether you just want a small mini arrangement or a really large statement piece.
So measure up where you plan to hang it and don't forget that the tulle netting will easily add on several inches either side of the edges of the frame.
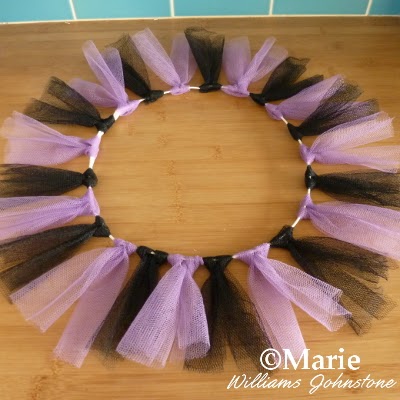
I like to start with one color of netting and space that first color evenly around the frame, leaving gaps in between for the other colors to come.
🎃 Here's how to tie the tulle strips onto the base of your wreath.

Step 2: In between the black tulle, I add in a second color choice which is purple. Now it's starting to fill out the frame a little.

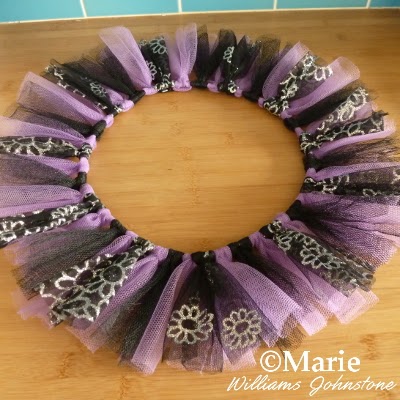
Step 3: In this one I've added in 2 lots of purple strips between all the black ones which just about covers the wire frame.
It still looks kinda sad at this point so you still need to keep on going to make a nice full wreath design.

Step 4: That's more like it! Now I've added in some black netting with silver glitter flowers and the whole thing looks nice and full enough for what I have in mind.
You could keep adding at this point and especially if you are leaving the middle section open. However, I'm covering mine over with a witchy decoration.

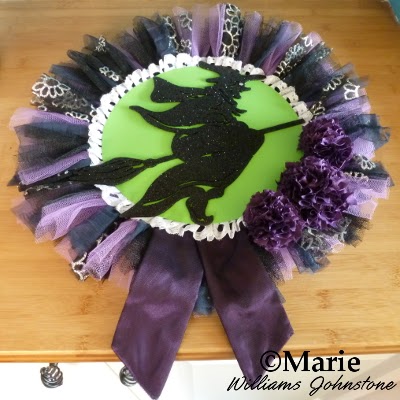
Step 5: I got this black glitter witch from the dollar store and it is just the right size to fill the middle of my wreath.
However, since it is black, it doesn't stand out or contrast enough from the fabric I've used for the tulle strips. So I have cut out a large circle of bright green card and stuck her on top using hot glue.

Step 6: The idea of adding in a white lace ruffle took my fancy so I used a glue gun to fix the lace to the back of the green card.

Step 7: Before I stuck the witch section in place, I added some wide purple ribbon at the bottom and stuck it to the back of the design. Then I used the hot glue to stick the witch down and added some purple silk fabric pom poms on top to finish it all off.
🎃 Tutorial to Make Fabric Pom Poms

Step 8: Here is the finished design. You can make your own design unique by choosing your own range of colors to fit with your decor for this occasion.
Perhaps you want more of a Fall look in oranges, creams and browns or more of a vampire look in black, red and white. You don't need to add a motif in the middle or you could just add in some lettering to spell out something like BOO.

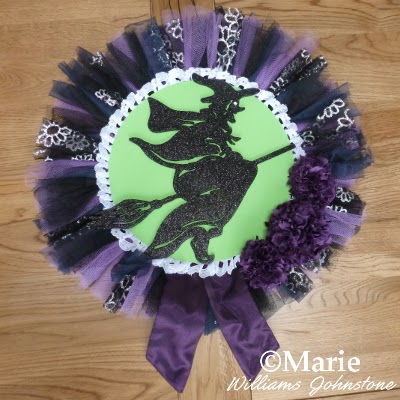
Here is the wreath design updated for this year. I took off the monster green background and added in a glitter silver backing card instead which works better along with all the silver and purple colors I've used this year.
The great thing is that you can change things up from year to year to refresh the decs that you already have. Get creative and have lots of fun.
Related Content You Should Also Love
Page Last Updated:
This fabric is a stiffer netting which makes it ideal since it will stand vertically and not just flop down as most fabrics would. It's ideal to use this netting for any decorations that you will use certainly indoors.
Tulle can be used outdoors on a fine day but remember to bring it inside overnight as damp will not benefit it at all. You are better off using a unique and much stiffer material called Deco Mesh for items that you want to place outdoors and that's because it's more weatherproof.
Note: This post may contain affiliate links for which I can be compensated.
Easy How to Make a Tulle Wreath for Halloween

Come see how to make this fun design which you can hang up inside your home for a frightful Halloween.
Here's What You Need to Make This Tulle Wreath for Halloween:
- A wreath base which you can buy or make, tutorials to make these are listed below
- Twine or cord to hang up the finished design
- Tulle strips in your choice of 2-5 colors and around 2-4 inches wide and 12-15 inches long
- Embellishments: I used fabric pom poms and a dollar store Witch design
- Scissors and a hot glue gun

Step 1: First you need a wreath base. I made a wire one for this project although I actually prefer using cardboard ones.
You can buy wreath bases and frames to use usually from wire or styrofoam although I prefer to make mine for no cost from whatever I have to hand. Here's my tutorials on making your own base to use:
🎃 How to make a DIY cardboard wreath base
You make your frame the size that you want it. It really depends where you plan to hang it up and whether you just want a small mini arrangement or a really large statement piece.
So measure up where you plan to hang it and don't forget that the tulle netting will easily add on several inches either side of the edges of the frame.
I like to start with one color of netting and space that first color evenly around the frame, leaving gaps in between for the other colors to come.
🎃 Here's how to tie the tulle strips onto the base of your wreath.

Step 2: In between the black tulle, I add in a second color choice which is purple. Now it's starting to fill out the frame a little.

Step 3: In this one I've added in 2 lots of purple strips between all the black ones which just about covers the wire frame.
It still looks kinda sad at this point so you still need to keep on going to make a nice full wreath design.

Step 4: That's more like it! Now I've added in some black netting with silver glitter flowers and the whole thing looks nice and full enough for what I have in mind.
You could keep adding at this point and especially if you are leaving the middle section open. However, I'm covering mine over with a witchy decoration.

Step 5: I got this black glitter witch from the dollar store and it is just the right size to fill the middle of my wreath.
However, since it is black, it doesn't stand out or contrast enough from the fabric I've used for the tulle strips. So I have cut out a large circle of bright green card and stuck her on top using hot glue.

Step 6: The idea of adding in a white lace ruffle took my fancy so I used a glue gun to fix the lace to the back of the green card.

Step 7: Before I stuck the witch section in place, I added some wide purple ribbon at the bottom and stuck it to the back of the design. Then I used the hot glue to stick the witch down and added some purple silk fabric pom poms on top to finish it all off.
🎃 Tutorial to Make Fabric Pom Poms

Step 8: Here is the finished design. You can make your own design unique by choosing your own range of colors to fit with your decor for this occasion.
Perhaps you want more of a Fall look in oranges, creams and browns or more of a vampire look in black, red and white. You don't need to add a motif in the middle or you could just add in some lettering to spell out something like BOO.

Here is the wreath design updated for this year. I took off the monster green background and added in a glitter silver backing card instead which works better along with all the silver and purple colors I've used this year.
The great thing is that you can change things up from year to year to refresh the decs that you already have. Get creative and have lots of fun.
Related Content You Should Also Love
How to Tie Tulle Strips around a DIY Wreath
Make a DIY Cardboard Ring for a Wreath
Making Deco Mesh Wreaths for Outdoor Use
Turn a Wire Hanger into a Wreath Form
More on Halloween Wreaths
Make a DIY Cardboard Ring for a Wreath
Making Deco Mesh Wreaths for Outdoor Use
Turn a Wire Hanger into a Wreath Form
More on Halloween Wreaths
Page Last Updated:


Comments
Post a Comment
Just Halloween Crafts is a site dedicated to my favorite time of year and the whole spook time season that surrounds October 31st. I love to decorate the home with handmade, DIY and crafted items for Halloween as well as make costume accessories and do fun crafting activities. Using papercrafts, sewing with felt, no-sew techniques and more, you can create a wonderful scheme to your decor whether you are going for scary themes or more fun ones with pumpkins and more. Ghosts, witches, wizards and more make for fun crafting sessions. Thanks for leaving me a comment. Comments do not show until I approve them. Marie