Bat Pom Pom Craft Tutorial and Free Template
Now yarn pom poms are super easy and quick to make with the introduction of lots of modern makers and gizmos, it means you can quickly create some easy DIY hanging bat decorations for Halloween.
These Bat pom poms can be hung down a wall, from a shelf, across a door or opening or in a porch even. They make rather cute looking and cuddly yarn pets for the spook time season. Come see how to make these by reading on.
These are simple to make and I've made it even easier by providing my template for the wings as a free printable so you don't need to draw some yourself. Kids can have fun making these using a child friendly alternative to a glue gun or just by getting adults to do all the sticking instead.
Note: This post may contain affiliate links for which I can be compensated.

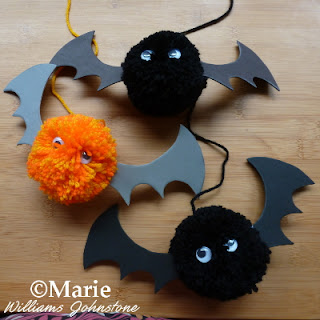
These bat pom poms are easy and fun to make and look great hanging down from the ceiling or wall. They make a spook-tackular decoration for Halloween and are a cute kids craft.

First make up your pom poms, you need 1 for every bat
Step 1: First you need to make your pom poms. I have a tutorial on how to make pom poms with my favorite Clover maker device or you can use a different method.
Whatever way you use to make them, make sure to leave a long tail of yarn (twine or cord) at the end when you tie them off. This can be used to hang them up with.

Black and orange colors are great for spooky pom pom bats for Halloween
Step 2: Black and orange make great choices of yarn colors for Halloween but you could also try funky and bright shades of witch purple, monster green and ghostly white. Gray makes a great choice if you want more of a natural looking shade apart from the obvious of black.
The colors you use might depend on the backdrop where you plan to hang them as well. Should the bats stand out or blend in?
Make sure your hanging thread is top center and then stick the wiggle eyes or googly eyes on first. These can be fiddly to stick on.
Adults can use a fine tipped glue gun or an alternative, better for kids too, is to use some sticky glue dots and press the eyes down well to stick. You can see in the photo above where the eyes are placed in relation to the hanging thread of yarn.

Draw out wings or use my free bat wing template below to trace around
Step 3: You can draw out your own bat shaped wings or use my free printable template to cut out and trace around which is below near the end of this page.
You can use a regular pencil to draw onto craft foam, the pencil line might be faint and especially on dark foam sheets. However, if you press hard enough, you should be able to see the mark where the tip of the pencil has dug into the surface.

Wings look good cut from craft foam
Step 4: Here's 3 pairs of wings cut out from craft foam sheets in black and gray. If you don't have craft foam then a thick card would work instead.
You can leave the wings plain or kids especially might like to decorate them and glitter glue pens would make a fun choice for this although you'd need to allow for drying time before attaching them to the body of each bat.

Stick the wings into each bat pom pom at the sides
Step 5: Sticking the wings into the body area is slightly tricky. I like to use my finger to make a "path" in the yarn to the side of each eye and then smear glue all around the end of the wing piece (back and front) and then place this in the area where the yarn strands are parted.
Now press the yarn over the adhesive until stuck in place. I do find this easier with a glue gun since it doesn't take long to stick but watch your fingers.

Make matching ears to finish this little monster off
Step 6: Finish up by cutting out two triangles and sticking them above the eyes to make pointy bat ears. Now your cute little flying monster is ready to hang up somewhere.
Click on the image to open up the full size which is best for printing and choose "Save As" or "Save Image As" to download it.

Note there are two sizes of wings on the template so you can choose larger or smaller versions that will work best with your size of yarn pom. You need to flip the wing over and trace around the other side to get your matching pair of wings.
This free bat wing printable is for your personal use only. You are welcome to blog about how you've used this freebie along with your own photos providing that you include a link back to this page.
I hope you've enjoyed reading my justhalloweencrafts page today, thanks for your visit. Come back again when you're looking for crafts for this occasion.
Related Content You Should Also Love:
Page Last Updated:
These Bat pom poms can be hung down a wall, from a shelf, across a door or opening or in a porch even. They make rather cute looking and cuddly yarn pets for the spook time season. Come see how to make these by reading on.
These are simple to make and I've made it even easier by providing my template for the wings as a free printable so you don't need to draw some yourself. Kids can have fun making these using a child friendly alternative to a glue gun or just by getting adults to do all the sticking instead.
Note: This post may contain affiliate links for which I can be compensated.
Bat Pom Pom Craft Tutorial and Free Template for the Wings

These bat pom poms are easy and fun to make and look great hanging down from the ceiling or wall. They make a spook-tackular decoration for Halloween and are a cute kids craft.
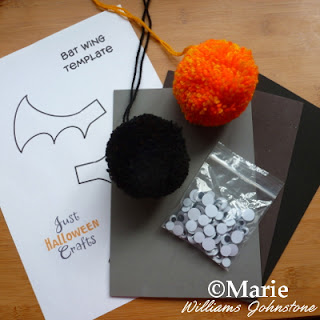
To Make Your Bat Pom Poms: Tools and Materials
- Some completed yarn pom poms
- Craft foam, I used black and gray shades
- Wiggly googly eyes
- Pencil, scissors
- Wing template, free printable below or draw your own
- Adhesive, I used a glue gun

First make up your pom poms, you need 1 for every bat
Step 1: First you need to make your pom poms. I have a tutorial on how to make pom poms with my favorite Clover maker device or you can use a different method.
Whatever way you use to make them, make sure to leave a long tail of yarn (twine or cord) at the end when you tie them off. This can be used to hang them up with.

Black and orange colors are great for spooky pom pom bats for Halloween
Step 2: Black and orange make great choices of yarn colors for Halloween but you could also try funky and bright shades of witch purple, monster green and ghostly white. Gray makes a great choice if you want more of a natural looking shade apart from the obvious of black.
The colors you use might depend on the backdrop where you plan to hang them as well. Should the bats stand out or blend in?
Make sure your hanging thread is top center and then stick the wiggle eyes or googly eyes on first. These can be fiddly to stick on.
Adults can use a fine tipped glue gun or an alternative, better for kids too, is to use some sticky glue dots and press the eyes down well to stick. You can see in the photo above where the eyes are placed in relation to the hanging thread of yarn.

Draw out wings or use my free bat wing template below to trace around
Step 3: You can draw out your own bat shaped wings or use my free printable template to cut out and trace around which is below near the end of this page.
You can use a regular pencil to draw onto craft foam, the pencil line might be faint and especially on dark foam sheets. However, if you press hard enough, you should be able to see the mark where the tip of the pencil has dug into the surface.

Wings look good cut from craft foam
Step 4: Here's 3 pairs of wings cut out from craft foam sheets in black and gray. If you don't have craft foam then a thick card would work instead.
You can leave the wings plain or kids especially might like to decorate them and glitter glue pens would make a fun choice for this although you'd need to allow for drying time before attaching them to the body of each bat.

Stick the wings into each bat pom pom at the sides
Step 5: Sticking the wings into the body area is slightly tricky. I like to use my finger to make a "path" in the yarn to the side of each eye and then smear glue all around the end of the wing piece (back and front) and then place this in the area where the yarn strands are parted.
Now press the yarn over the adhesive until stuck in place. I do find this easier with a glue gun since it doesn't take long to stick but watch your fingers.

Make matching ears to finish this little monster off
Step 6: Finish up by cutting out two triangles and sticking them above the eyes to make pointy bat ears. Now your cute little flying monster is ready to hang up somewhere.
Free Printable Bat Wing Template for this Pom Pom Craft
Click on the image to open up the full size which is best for printing and choose "Save As" or "Save Image As" to download it.

Note there are two sizes of wings on the template so you can choose larger or smaller versions that will work best with your size of yarn pom. You need to flip the wing over and trace around the other side to get your matching pair of wings.
This free bat wing printable is for your personal use only. You are welcome to blog about how you've used this freebie along with your own photos providing that you include a link back to this page.
I hope you've enjoyed reading my justhalloweencrafts page today, thanks for your visit. Come back again when you're looking for crafts for this occasion.
Related Content You Should Also Love:
Cute Little Red Devil Pom Poms
How to Make Furry Free-Standing Spiders
Pom Pom Witch Wand Tutorial
More Halloween Kids Crafts
More Craft Tutorials
How to Make Furry Free-Standing Spiders
Pom Pom Witch Wand Tutorial
More Halloween Kids Crafts
More Craft Tutorials
Page Last Updated:


Comments
Post a Comment
Just Halloween Crafts is a site dedicated to my favorite time of year and the whole spook time season that surrounds October 31st. I love to decorate the home with handmade, DIY and crafted items for Halloween as well as make costume accessories and do fun crafting activities. Using papercrafts, sewing with felt, no-sew techniques and more, you can create a wonderful scheme to your decor whether you are going for scary themes or more fun ones with pumpkins and more. Ghosts, witches, wizards and more make for fun crafting sessions. Thanks for leaving me a comment. Comments do not show until I approve them. Marie