How to Make a Pom Pom Wand Tutorial
No longer seen as an old fashioned craft, pom poms are very much back in vogue and are perfect for so many crafts and decorations. Pom poms are now also made from fabric and tulle netting which is pretty modern and cutting edge.
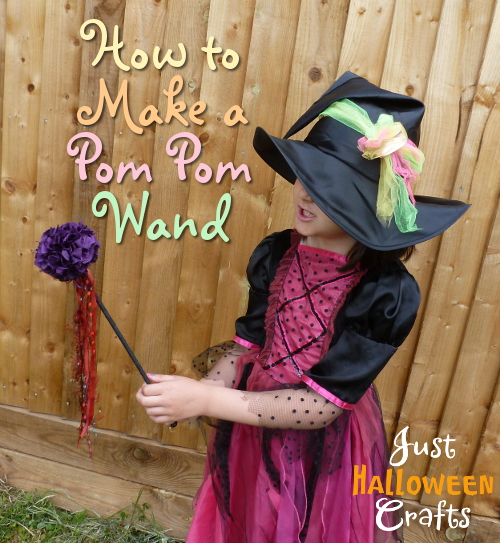
Wands that you want to make for kid's dressing up and for Halloween costume accessories look especially good topped off with tulle netting or satin fabric pom poms. Tulle is fun but satin fabric versions have a gorgeous silky sheen and a really raggedy shabby chic style which works brilliantly for a witch wand.
Today I'm making one in purple and black witch themed colors. You can change the styling up to make different versions for fairies, princesses, wizards and many other magical beings. It's quick, fun and easy which is just the kind of craft I like best of all!
Note: This post may contain affiliate links for which I can be compensated.

When I mention pom pom crafts, you're probably thinking of the old yarn versions. These were used a lot on handmade clothes back in the 1970s when that was seen as pretty fashionable.
Nowadays we can make them in funky looking yarns, try variegated color change yarns and glitter ones for something different. And we can also use fabrics for a more modern look too.

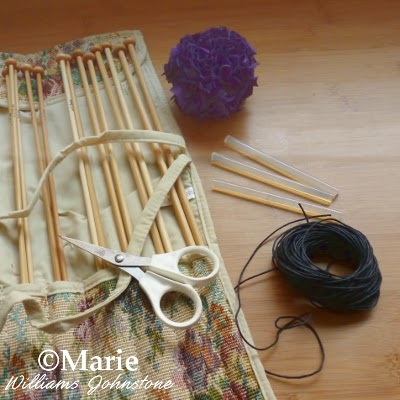
2: Your finished pom pom. I've done loads of tutorials on making different kinds of these so I'll be giving you access to those tutorials when we get around to that section.
3: Yarn, thin cord or ribbon. You can use these to wrap around your wooden knitting needle or dowel stick.
4: A glue gun and some scissors. I also use a black Sharpie marker pen.

Use a glue gun to fix cord to the top of the dowel or wooden knitting needle
Step 1: I'm going for a real all-out Halloween look in black and purple so I choose some thin black leather cord which is about 1.5mm thickness although you could also use 2mm. This is the type of leather cord that you use for necklace beading.
Leather cord has a great look to it with a bit of a nice sheen and gives you an alternative look from wrapping with ribbon which is great for those fairy and princess costume accessories but doesn't necessarily work so well for other looks like Halloween. But know that you can do this exact same technique using thin cord, twine, yarn and even embroidery floss.
Glue guns do work best because they are quick setting. If you have another type of adhesive that sets almost instantly then that would work but a slow dry adhesive on this project will drive you just a little bit crazy.
You need only a small dab of glue as well so a mini glue gun version with smaller nozzle is also a bonus and easier to use. It goes without saying that the glue can be very hot especially if you're using a standard high temp version and this is not something that kids or minors should be using either.
Start by adding a dab of adhesive at one end of your chosen wand base, either the end that's not pointy on your wooden knitting needle or either end of your dowel rod. Press the end of cord into the adhesive and allow it to set fast to secure the cord.

Wrap the cord around the wand base and fix occasionally in place with glue
Step 3:The easiest way to describe the wrapping technique is to say that you need to hold the stick in one hand (I hold in in the left as I'm right handed) and hold the cord length in your other hand.
You twist the stick slowly over to the left and make sure the cord is always being coiled round right next to the cord wrapped previously. You don't want to see any gaps between the cord.
Every 10-20mm or so is where you need to add another dab of glue onto the stick and then quickly wrap your cord over it. You need to do this to secure the cord properly on the wood so that it is firmly stuck in place and doesn't unravel.

Attach the fabric pom pom to the end of the wand base
Step 4: Wrap almost to the end then snip the cord and make sure it is firmly glued down into place. You now need your pom pom to fix onto this end. Here's my tutorials for you depending what type you want to make and there are of course a myriad of videos on YouTube:
Making a Standard Yarn Pom Pom with the Clover Maker
Tutorial to Make a Fabric Pom Pom
How to Make a Pom Pom from Tulle Netting
Before you add on any adhesive, find a place in your pom pom where the stick or knitting needle can comfortably be placed into. You need the stick to insert into the middle section of it so make sure there's some room for that first, if not poke with a pencil end to make some.
Then keeping this entry place parted with one hand (you could do with about 3 hands here) add plenty of adhesive to the end of your stick and insert up into the pom. Wiggle to make sure it's all secure and allow to set.

Color any exposed bits of wood with a Sharpie pen
Step 5: Because I used an old knitting needle, I used a black permanent Sharpie marker to color in the end of it to match up with the color of the leather cord.
I also used the black Sharpie to touch up down the wrapped cording where you could see some bits of the clear adhesive over the top. It just neatens it all up. You could do the same to the end of the dowel where wood is exposed as well.

The scrappy fabric is an ideal look for a witch wand
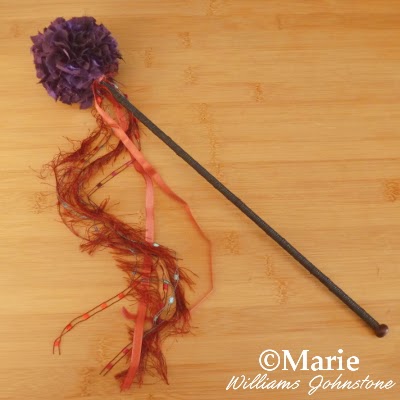
Step 6: This is just to show you how the fabric looks. I made this one with a purple satin fabric and it's got a great scrappy look to it with the raw edges and threads and it's perfect for a Halloween witch wand.
Tulle netting gives another look, also modern and works well with a fairy costume or a costume which also uses lots of tulle fabric.

Add on ribbons and decorations to your DIY pom pom wand
Step 7: You can really go crazy at this stage and add on loads of decorations. I don't think these pom pom wands need it and that's my personal preference. I just tied some pretty ribbons under the pom and secured the knot with glue.
It's quick and simple to do. I hope you've enjoyed reading my justhalloweencrafts page today, thanks for your visit. If you have any questions or comments, you can leave a comment below for me.

Related Content You Should Also Love
Page Last Updated:
Wands that you want to make for kid's dressing up and for Halloween costume accessories look especially good topped off with tulle netting or satin fabric pom poms. Tulle is fun but satin fabric versions have a gorgeous silky sheen and a really raggedy shabby chic style which works brilliantly for a witch wand.
Today I'm making one in purple and black witch themed colors. You can change the styling up to make different versions for fairies, princesses, wizards and many other magical beings. It's quick, fun and easy which is just the kind of craft I like best of all!
Note: This post may contain affiliate links for which I can be compensated.
How to Make a Pom Pom Wand Craft Tutorial

When I mention pom pom crafts, you're probably thinking of the old yarn versions. These were used a lot on handmade clothes back in the 1970s when that was seen as pretty fashionable.
Nowadays we can make them in funky looking yarns, try variegated color change yarns and glitter ones for something different. And we can also use fabrics for a more modern look too.

What You Need for this Fabric or Tulle Pom Pom Wand Tutorial:
1: A wand base. I love up-cycling my old wooden knitting needles because they are ideal in terms of sizing, especially when used as wands for kids. The needles would otherwise just be lying there. If you don't have any going spare then you can alternatively use dowel with a width of 1/4 inch and cut down to a length of 12-15 inches depending on who it is for.2: Your finished pom pom. I've done loads of tutorials on making different kinds of these so I'll be giving you access to those tutorials when we get around to that section.
3: Yarn, thin cord or ribbon. You can use these to wrap around your wooden knitting needle or dowel stick.
4: A glue gun and some scissors. I also use a black Sharpie marker pen.

Use a glue gun to fix cord to the top of the dowel or wooden knitting needle
Step 1: I'm going for a real all-out Halloween look in black and purple so I choose some thin black leather cord which is about 1.5mm thickness although you could also use 2mm. This is the type of leather cord that you use for necklace beading.
Leather cord has a great look to it with a bit of a nice sheen and gives you an alternative look from wrapping with ribbon which is great for those fairy and princess costume accessories but doesn't necessarily work so well for other looks like Halloween. But know that you can do this exact same technique using thin cord, twine, yarn and even embroidery floss.
Glue guns do work best because they are quick setting. If you have another type of adhesive that sets almost instantly then that would work but a slow dry adhesive on this project will drive you just a little bit crazy.
You need only a small dab of glue as well so a mini glue gun version with smaller nozzle is also a bonus and easier to use. It goes without saying that the glue can be very hot especially if you're using a standard high temp version and this is not something that kids or minors should be using either.
Start by adding a dab of adhesive at one end of your chosen wand base, either the end that's not pointy on your wooden knitting needle or either end of your dowel rod. Press the end of cord into the adhesive and allow it to set fast to secure the cord.

Wrap the cord around the wand base and fix occasionally in place with glue
Step 3:The easiest way to describe the wrapping technique is to say that you need to hold the stick in one hand (I hold in in the left as I'm right handed) and hold the cord length in your other hand.
You twist the stick slowly over to the left and make sure the cord is always being coiled round right next to the cord wrapped previously. You don't want to see any gaps between the cord.
Every 10-20mm or so is where you need to add another dab of glue onto the stick and then quickly wrap your cord over it. You need to do this to secure the cord properly on the wood so that it is firmly stuck in place and doesn't unravel.

Attach the fabric pom pom to the end of the wand base
Step 4: Wrap almost to the end then snip the cord and make sure it is firmly glued down into place. You now need your pom pom to fix onto this end. Here's my tutorials for you depending what type you want to make and there are of course a myriad of videos on YouTube:
Making a Standard Yarn Pom Pom with the Clover Maker
Tutorial to Make a Fabric Pom Pom
How to Make a Pom Pom from Tulle Netting
Before you add on any adhesive, find a place in your pom pom where the stick or knitting needle can comfortably be placed into. You need the stick to insert into the middle section of it so make sure there's some room for that first, if not poke with a pencil end to make some.
Then keeping this entry place parted with one hand (you could do with about 3 hands here) add plenty of adhesive to the end of your stick and insert up into the pom. Wiggle to make sure it's all secure and allow to set.

Color any exposed bits of wood with a Sharpie pen
Step 5: Because I used an old knitting needle, I used a black permanent Sharpie marker to color in the end of it to match up with the color of the leather cord.
I also used the black Sharpie to touch up down the wrapped cording where you could see some bits of the clear adhesive over the top. It just neatens it all up. You could do the same to the end of the dowel where wood is exposed as well.

The scrappy fabric is an ideal look for a witch wand
Step 6: This is just to show you how the fabric looks. I made this one with a purple satin fabric and it's got a great scrappy look to it with the raw edges and threads and it's perfect for a Halloween witch wand.
Tulle netting gives another look, also modern and works well with a fairy costume or a costume which also uses lots of tulle fabric.

Add on ribbons and decorations to your DIY pom pom wand
Step 7: You can really go crazy at this stage and add on loads of decorations. I don't think these pom pom wands need it and that's my personal preference. I just tied some pretty ribbons under the pom and secured the knot with glue.
It's quick and simple to do. I hope you've enjoyed reading my justhalloweencrafts page today, thanks for your visit. If you have any questions or comments, you can leave a comment below for me.

Related Content You Should Also Love
See How to Make a Cute Princess Craft Wand
Make a Magnificent Witch Spell Book Prop
Create a Wicked Witch Tulle Wreath
Witch Themed Decorations for Halloween
More Halloween Craft Tutorials
Make a Magnificent Witch Spell Book Prop
Create a Wicked Witch Tulle Wreath
Witch Themed Decorations for Halloween
More Halloween Craft Tutorials
Page Last Updated:


Comments
Post a Comment
Just Halloween Crafts is a site dedicated to my favorite time of year and the whole spook time season that surrounds October 31st. I love to decorate the home with handmade, DIY and crafted items for Halloween as well as make costume accessories and do fun crafting activities. Using papercrafts, sewing with felt, no-sew techniques and more, you can create a wonderful scheme to your decor whether you are going for scary themes or more fun ones with pumpkins and more. Ghosts, witches, wizards and more make for fun crafting sessions. Thanks for leaving me a comment. Comments do not show until I approve them. Marie