How to Make Paper Fans for Decorations
Making round paper fans is an easy craft that both kids and adults can do to make hanging decorations from small sizes up to large depending on the sheet sizes you use for construction.
This easy DIY paper fan craft can be used for Fall and Halloween as decor to hang on doors, mantels, walls and even from the ceiling. I like to use them as larger statement pieces. They look complicated to make when in fact these are easy peasy providing you know how to make accordion or concertina folds.
If you don't know how to make this zig zag style of valleys and mountains in sheets of paper, you'll find a gazillion tutorials on YouTube if you look for how to accordion or concertina fold. Most kids learn how to do this at school or in simple crafting activities.
Note: This post may contain affiliate links for which I can be compensated.

Materials and Tools Needed:

Step 1: you need 5 sheets of colored or patterned paper for each completed fan decoration. Regular letter size or A4 is a great choice.
Since this was a Fall themed craft where we wanted fun pieces to hang for Halloween, we choose plain orange paper but you could also pick variations on black, white, purple and green as well for ideal colors for this occasion.
It's a simple enough paper craft for young kids to do too. My then 7 year old made the finished piece in the intro photo.
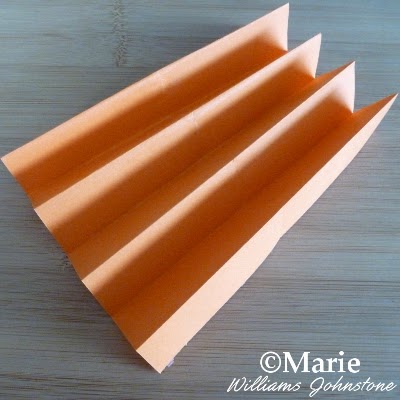
First you need to concertina or accordion fold along the longest side of the paper with folds of approx 1 inch making up the nicely creased zig zags. If you don't know how to do this fold, there are tons of videos on it on YouTube for you to watch and learn from. Many kids learn how to do this at school.

Step 2: once you've done the accordion or concertina fold along the whole sheet, you get a nice zig-zagged strip of paper. Fold this in half across the length of this strip as shown in the photo above.

Step 3: make 4 more of these folded pieces of paper for a total of 5. Go back to step 1 and follow the instructions if you need to.

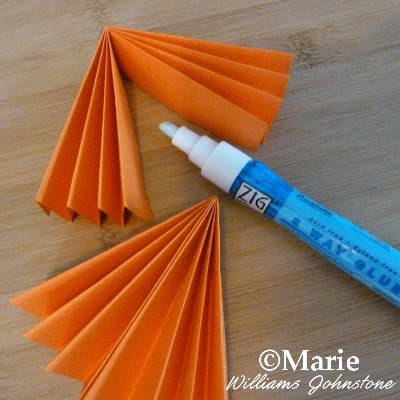
Step 4: use glue (I like a glue pen adhesive like Zig for this) to glue each folded paper piece shut in the middle as shown. When you stick it together in the middle, each piece makes a triangular shape.

Step 5: you now should have 5 folded pieces which look very like the ones shown in the image above.
I have arranged them into a circular shape which is how we want to now glue or stick them together to make a round fan decoration.

Step 6: add some adhesive down each side of these folded pieces and stick them together piece by piece so that the folded corners all meet in the middle. Joining all the pointy corners in the middle will make a round circle shape.

Step 7: you can see the circular fanned out shape coming together now most of the pieces have been stuck to each other.

Step 8: Adding in the final piece completes the design. It makes a really fun looking decoration.
You can punch a hole in the top and thread some string, twine or cord through to hang it up or you can decorate it even more with a design stuck on top of the circle. Kids and adults can have fun making this easy folding craft.
Why not try different colors and patterns and also use large sheets for more impressive designs. I hope you've enjoyed reading my justhalloweencrafts page today, thanks for your visit. Have fun adding cool designs into your home.
Page Last Updated:
This easy DIY paper fan craft can be used for Fall and Halloween as decor to hang on doors, mantels, walls and even from the ceiling. I like to use them as larger statement pieces. They look complicated to make when in fact these are easy peasy providing you know how to make accordion or concertina folds.
If you don't know how to make this zig zag style of valleys and mountains in sheets of paper, you'll find a gazillion tutorials on YouTube if you look for how to accordion or concertina fold. Most kids learn how to do this at school or in simple crafting activities.
Note: This post may contain affiliate links for which I can be compensated.
How to Make Paper Fans for Quick and Easy Decorations

Materials and Tools Needed:
- Some sheets of paper: plain colors like orange, black, purple and green look good
- Adhesive: I like Zig glue pens
- Some cord or twine for hanging the completed fan
- A hole punch or scissors to make a hole for hanging

Step 1: you need 5 sheets of colored or patterned paper for each completed fan decoration. Regular letter size or A4 is a great choice.
Since this was a Fall themed craft where we wanted fun pieces to hang for Halloween, we choose plain orange paper but you could also pick variations on black, white, purple and green as well for ideal colors for this occasion.
It's a simple enough paper craft for young kids to do too. My then 7 year old made the finished piece in the intro photo.
First you need to concertina or accordion fold along the longest side of the paper with folds of approx 1 inch making up the nicely creased zig zags. If you don't know how to do this fold, there are tons of videos on it on YouTube for you to watch and learn from. Many kids learn how to do this at school.

Step 2: once you've done the accordion or concertina fold along the whole sheet, you get a nice zig-zagged strip of paper. Fold this in half across the length of this strip as shown in the photo above.

Step 3: make 4 more of these folded pieces of paper for a total of 5. Go back to step 1 and follow the instructions if you need to.

Step 4: use glue (I like a glue pen adhesive like Zig for this) to glue each folded paper piece shut in the middle as shown. When you stick it together in the middle, each piece makes a triangular shape.

Step 5: you now should have 5 folded pieces which look very like the ones shown in the image above.
I have arranged them into a circular shape which is how we want to now glue or stick them together to make a round fan decoration.

Step 6: add some adhesive down each side of these folded pieces and stick them together piece by piece so that the folded corners all meet in the middle. Joining all the pointy corners in the middle will make a round circle shape.

Step 7: you can see the circular fanned out shape coming together now most of the pieces have been stuck to each other.

Step 8: Adding in the final piece completes the design. It makes a really fun looking decoration.
You can punch a hole in the top and thread some string, twine or cord through to hang it up or you can decorate it even more with a design stuck on top of the circle. Kids and adults can have fun making this easy folding craft.
Why not try different colors and patterns and also use large sheets for more impressive designs. I hope you've enjoyed reading my justhalloweencrafts page today, thanks for your visit. Have fun adding cool designs into your home.
Related Content You Should Also Love
Eyeball and Skull Paper Fans to Make
Easy Tissue Paper Garland that Kids can Make
Halloween Boo Banner Craft
Halloween Crafts for Kids
Halloween Papercrafts to Enjoy
Easy Tissue Paper Garland that Kids can Make
Halloween Boo Banner Craft
Halloween Crafts for Kids
Halloween Papercrafts to Enjoy
Page Last Updated:


Comments
Post a Comment
Just Halloween Crafts is a site dedicated to my favorite time of year and the whole spook time season that surrounds October 31st. I love to decorate the home with handmade, DIY and crafted items for Halloween as well as make costume accessories and do fun crafting activities. Using papercrafts, sewing with felt, no-sew techniques and more, you can create a wonderful scheme to your decor whether you are going for scary themes or more fun ones with pumpkins and more. Ghosts, witches, wizards and more make for fun crafting sessions. Thanks for leaving me a comment. Comments do not show until I approve them. Marie