Easy Halloween Tissue Paper Garland Tutorial
This is a quick and easy craft to make a simple hanging decoration or garland using tissue paper. It's so quick and easy that kids can learn to make this too. They will need to know how to fold concertina or accordion style, how to cut with scissors and how to tie a double knot.
Many age 7+ children will have some or all of the skills to create this easy Halloween tissue paper garland. We choose to make this using black and orange tissue paper for the Fall season.
Black and a nice pumpkin orange fit with our theme well but you may want to choose ghostly white, grays, purples, monster greens, blood reds or other colors that work with your own choice of decorations around the home.
Note: This post may contain affiliate links for which I can be compensated.

You can make it from thicker papers too although the thicker sheets make it slightly harder and more difficult to put together.
Materials and Tools Needed

Step 1: Take a whole sheet of tissue with the longest side laid out before you and do a concertina or accordion fold down the whole thing.
A concertina fold is where you make a zig zag shape in the paper. I made my folds around an inch in height.
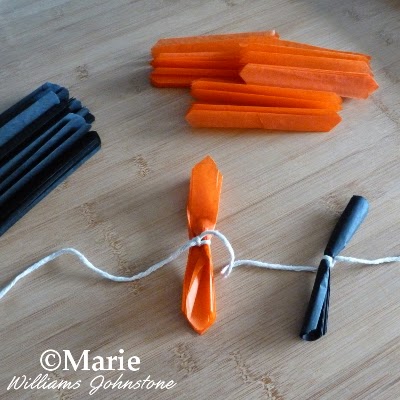
Once a whole sheet was folded, I cut this into 4 similar sized rectangular strips as shown in the photo above.
On some of the strips I cut the ends into pointed V shapes and on others I cut a rounded U shape - these look different when you come to the unfolding process later on.

Step 2: Keep folding sheets until you have lots of folded strips in the colors you want for your finished decoration. I made lots in black and orange.
Cut off a long piece of cord or twine (it needs to be longer than the area where it will be hung) and tie the folded strips on at regular intervals.
To tie a strip on, lay it vertically across the twine or string and make a double knot across the middle to secure the folded tissue in place.

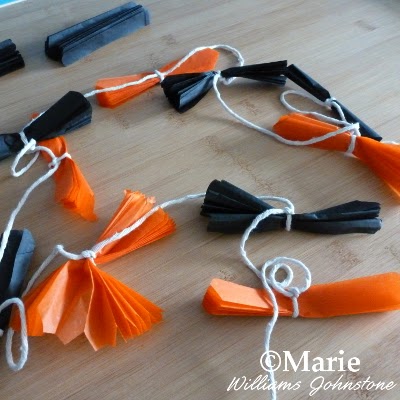
Step 3: Tie on the paper strips in the color order that you want. I alternated my colors down the length of twine. Keep adding until you have enough.

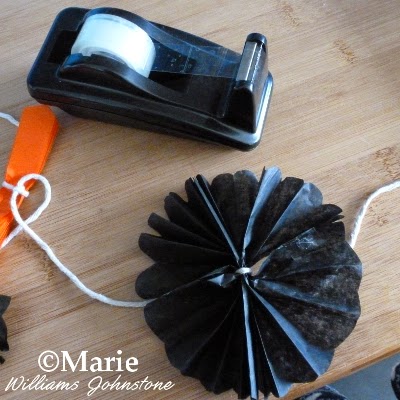
Step 4: Once all the tissue pieces are added, you can start gently pulling at the tops and bottoms of each piece to fan the folds out wide as shown. It is quick to do and makes a nice rosette shape.

Step 5: If you like, you can use some sticky tape to stick the bottom part of the unfolded fan to the top part so they meet in the middle. You don't need to do this, it just looks a little neater.

Now you can hang up your completed decoration. We put ours down the staircase but you can hang these across walls, doors, mirrors, mantelpieces and more to quickly add in some color for this occasion.
The tissue paper garlands are simple and very inexpensive to make and looks like a row of pretty flowers.
The skeletons were dollar store additions which were added on to the stairs as well. I hope you've enjoyed reading my justhalloweencrafts page today, thanks for your visit. Let me know what you'll be making in the comments below.
Related Content You Should Also Love:
Page Last Updated:
Many age 7+ children will have some or all of the skills to create this easy Halloween tissue paper garland. We choose to make this using black and orange tissue paper for the Fall season.
Black and a nice pumpkin orange fit with our theme well but you may want to choose ghostly white, grays, purples, monster greens, blood reds or other colors that work with your own choice of decorations around the home.
Note: This post may contain affiliate links for which I can be compensated.
Easy Halloween Tissue Paper Garland Craft Tutorial

You can make it from thicker papers too although the thicker sheets make it slightly harder and more difficult to put together.
Materials and Tools Needed
- Tissue papers in your choice of colors
- Twine or cord that you can knot
- Scissors
- Sticky tape (optional)

Step 1: Take a whole sheet of tissue with the longest side laid out before you and do a concertina or accordion fold down the whole thing.
A concertina fold is where you make a zig zag shape in the paper. I made my folds around an inch in height.
Once a whole sheet was folded, I cut this into 4 similar sized rectangular strips as shown in the photo above.
On some of the strips I cut the ends into pointed V shapes and on others I cut a rounded U shape - these look different when you come to the unfolding process later on.

Step 2: Keep folding sheets until you have lots of folded strips in the colors you want for your finished decoration. I made lots in black and orange.
Cut off a long piece of cord or twine (it needs to be longer than the area where it will be hung) and tie the folded strips on at regular intervals.
To tie a strip on, lay it vertically across the twine or string and make a double knot across the middle to secure the folded tissue in place.

Step 3: Tie on the paper strips in the color order that you want. I alternated my colors down the length of twine. Keep adding until you have enough.

Step 4: Once all the tissue pieces are added, you can start gently pulling at the tops and bottoms of each piece to fan the folds out wide as shown. It is quick to do and makes a nice rosette shape.

Step 5: If you like, you can use some sticky tape to stick the bottom part of the unfolded fan to the top part so they meet in the middle. You don't need to do this, it just looks a little neater.

Now you can hang up your completed decoration. We put ours down the staircase but you can hang these across walls, doors, mirrors, mantelpieces and more to quickly add in some color for this occasion.
The tissue paper garlands are simple and very inexpensive to make and looks like a row of pretty flowers.
The skeletons were dollar store additions which were added on to the stairs as well. I hope you've enjoyed reading my justhalloweencrafts page today, thanks for your visit. Let me know what you'll be making in the comments below.
Related Content You Should Also Love:
Tissue Paper Large Pom Pom Decorations
Halloween Banner with Printables
Hanging Felt No Sew Halloween Butterfly Decoration
More Decorations for Halloween
More Halloween Papercrafts
Halloween Banner with Printables
Hanging Felt No Sew Halloween Butterfly Decoration
More Decorations for Halloween
More Halloween Papercrafts
Page Last Updated:


Comments
Post a Comment
Just Halloween Crafts is a site dedicated to my favorite time of year and the whole spook time season that surrounds October 31st. I love to decorate the home with handmade, DIY and crafted items for Halloween as well as make costume accessories and do fun crafting activities. Using papercrafts, sewing with felt, no-sew techniques and more, you can create a wonderful scheme to your decor whether you are going for scary themes or more fun ones with pumpkins and more. Ghosts, witches, wizards and more make for fun crafting sessions. Thanks for leaving me a comment. Comments do not show until I approve them. Marie