Hanging Felt Butterfly Decoration for Halloween
Love butterfly crafts? Why not make some fun no-sew hanging butterflies as decorations for Halloween. Make one larger statement piece or make lots in smaller sizes to dot around a room.
I've made this hanging butterfly in a bright pumpkin orange felt fabric overlapped onto dark gray with a black body section. Also try combinations with purple and green wings for colors that work well with this occasion.
This makes for a fun hanging decoration that can be suspended from a ceiling or archway as if in flight or hung flat down a wall. They also make great motifs too for other craft projects.
Note: This post may contain affiliate links for which I can be compensated.

You may have your own stencil or template to use or you may even have a craft cutter that can produce something similar and cut onto felt fabric for you.
🎃 I have the Free Printable Butterfly Silhouette Template Here
And, if you don't know how to turn it into a stencil template that you can use to trace around, I also have a separate tutorial on that: Make This Butterfly Stencil Template

Materials and Tools You Need:

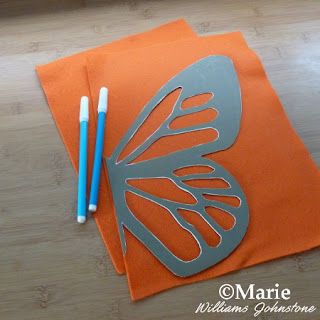
Trace around the stencil, one side then the other, along the edge of felt sheets
Step 1: My stencil was large so I traced around one side onto one sheet of orange felt fabric and then flipped it over horizontally and traced around the other side onto another sheet using water soluble fabric marker pens.
If you have a larger piece of felt (probably cut from a roll) then you can trace the whole design onto a single piece. You can do it either way since the black body section covers over the join if you need to cut from two separate sheets.

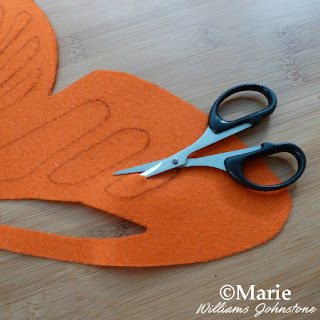
Cut out the inner design sections on the butterfly
Step 2: I love felt for this project because you can easily cut out the inner detail pieces on the wings of the butterfly with a small and sharp pair of scissors. I use small and sharp embroidery scissors to cut away the inside patterns.

Both wing pieces are fully cut out
Step 3: Here's both wings when all the insides have been cut away and the outside edges of the wings have been cut too.
The cutting is the most time consuming part of the project but it gives such a cool stencil effect when you layer it over a contrasting piece of felt or fabric.

Layer each wing over some contrasting felt and glue in place
Step 4: I find that Aleenes Tacky Glue is particularly good for gluing felt onto felt fabric or you can try using a white PVA based glue instead. Put some into a container and mix just a little water with it to make it easier to spread.
Then smear the glue over the back of each wing piece and stick them down onto a contrasting color. I used a dark gray felt which works well with the orange. Once dry, you can cut around the wings to trim the excess gray felt off.

Add the black body section over the middle to cover the join of the wings
Step 5: Cut a body section for the butterfly with a piece of black felt. Align both the wing pieces up and glue the body over the top.
If you are concerned that this will not be enough to hold both wing pieces together in place, you can stitch or hand sew the join at the back or glue another black body section at the back to strengthen the whole design.
If you use some clear fishing line or a transparent cord, you can attach this at the back of your butterfly decoration and hang it up giving the appearance that it is just floating in air. The clear cording is extremely hard to see and fishing line is pretty strong too.
You can also decorate your design further although I liked just the contrast of the different felt colors. Instead of felt you could also try craft foam or paper. I hope you've enjoyed reading my justhalloweencrafts page today, thanks for your visit. Let me know if you make any!
Related Content You Should Also Love
Page Last Updated:
I've made this hanging butterfly in a bright pumpkin orange felt fabric overlapped onto dark gray with a black body section. Also try combinations with purple and green wings for colors that work well with this occasion.
This makes for a fun hanging decoration that can be suspended from a ceiling or archway as if in flight or hung flat down a wall. They also make great motifs too for other craft projects.
Note: This post may contain affiliate links for which I can be compensated.
Hanging Felt Butterfly Decoration to Make for Halloween

You may have your own stencil or template to use or you may even have a craft cutter that can produce something similar and cut onto felt fabric for you.
🎃 I have the Free Printable Butterfly Silhouette Template Here
And, if you don't know how to turn it into a stencil template that you can use to trace around, I also have a separate tutorial on that: Make This Butterfly Stencil Template

Materials and Tools You Need:
- Your Butterfly Template or Stencil (link to free printable above)
- Felt Fabric Sheets (I used 2 orange, 2 dark gray and a small piece of black)
- Water soluble fabric marker pens
- Fabric scissors
- Aleenes Tacky Glue or similar
- String to hang - I used clear fishing line

Trace around the stencil, one side then the other, along the edge of felt sheets
Step 1: My stencil was large so I traced around one side onto one sheet of orange felt fabric and then flipped it over horizontally and traced around the other side onto another sheet using water soluble fabric marker pens.
If you have a larger piece of felt (probably cut from a roll) then you can trace the whole design onto a single piece. You can do it either way since the black body section covers over the join if you need to cut from two separate sheets.

Cut out the inner design sections on the butterfly
Step 2: I love felt for this project because you can easily cut out the inner detail pieces on the wings of the butterfly with a small and sharp pair of scissors. I use small and sharp embroidery scissors to cut away the inside patterns.

Both wing pieces are fully cut out
Step 3: Here's both wings when all the insides have been cut away and the outside edges of the wings have been cut too.
The cutting is the most time consuming part of the project but it gives such a cool stencil effect when you layer it over a contrasting piece of felt or fabric.

Layer each wing over some contrasting felt and glue in place
Step 4: I find that Aleenes Tacky Glue is particularly good for gluing felt onto felt fabric or you can try using a white PVA based glue instead. Put some into a container and mix just a little water with it to make it easier to spread.
Then smear the glue over the back of each wing piece and stick them down onto a contrasting color. I used a dark gray felt which works well with the orange. Once dry, you can cut around the wings to trim the excess gray felt off.

Add the black body section over the middle to cover the join of the wings
Step 5: Cut a body section for the butterfly with a piece of black felt. Align both the wing pieces up and glue the body over the top.
If you are concerned that this will not be enough to hold both wing pieces together in place, you can stitch or hand sew the join at the back or glue another black body section at the back to strengthen the whole design.
If you use some clear fishing line or a transparent cord, you can attach this at the back of your butterfly decoration and hang it up giving the appearance that it is just floating in air. The clear cording is extremely hard to see and fishing line is pretty strong too.
You can also decorate your design further although I liked just the contrast of the different felt colors. Instead of felt you could also try craft foam or paper. I hope you've enjoyed reading my justhalloweencrafts page today, thanks for your visit. Let me know if you make any!
Related Content You Should Also Love
Make a Cute Pumpkin Little Treat Bag
Easy Fabric Pom Pom Wand
Create Your Own Hanging Pom Pom Bats
Best Butterfly Crafts for Adults
Make More Decorations for Halloween
Easy Fabric Pom Pom Wand
Create Your Own Hanging Pom Pom Bats
Best Butterfly Crafts for Adults
Make More Decorations for Halloween
Page Last Updated:


Comments
Post a Comment
Just Halloween Crafts is a site dedicated to my favorite time of year and the whole spook time season that surrounds October 31st. I love to decorate the home with handmade, DIY and crafted items for Halloween as well as make costume accessories and do fun crafting activities. Using papercrafts, sewing with felt, no-sew techniques and more, you can create a wonderful scheme to your decor whether you are going for scary themes or more fun ones with pumpkins and more. Ghosts, witches, wizards and more make for fun crafting sessions. Thanks for leaving me a comment. Comments do not show until I approve them. Marie