How to Sew a Hood onto a Cape
This photo tutorial gives you a good guide on how to attach a hood onto a cape or cloak which has no fancy extras such as lining. You'll see how I did it with photos provided.
Not everyone wants to go to the time, bother and extra fabric expense to line a costume or dress up cloak when it may only be worn a few times for Halloween. I certainly didn't. Here's how it is done.
Note: This post may contain affiliate links for which I can be compensated.
How to Sew a Hood onto a Cape or Cloak

First, if you need a tutorial on making a hood, head on over here where I explain how to make this:
🎃 How to Sew a Basic Cloak Hood without having a Pattern

Step 1: Find the middle point of your hood across the bottom seam. If you made your hood using my instructions above this will be easy because the middle point is where the sewn seam runs from bottom to top.
You may, otherwise, need to fold the hood vertically to find and mark off the middle point on the inside of the fabric.
Next you need to find the middle point on the neck of your cape. Fold the collar area in half to find where the middle is. Mark this off using tailor's chalk or a water soluble fabric pen.
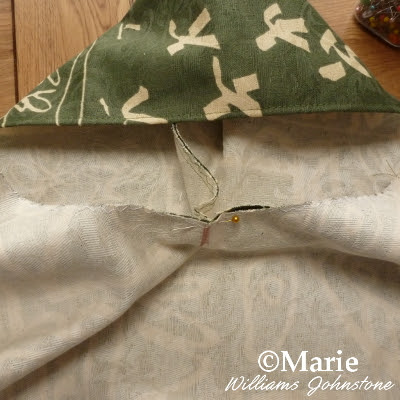
Match up the mid point on the inside of the hood to the mid point of the neck area on the cape and pin as shown.

Step 2: Next pin the very left of the bottom of the hood to the left of the neck on the cape. I pin about 1/4 inch down from the edges of the fabric. Now pin all in between these points.
You will probably need to gather some material or fabric on either the neck or the hood (whichever is bigger than the other) to get the two pieces to fit.
You should be able to see in the photo that I just needed to make a small tuck in the middle of this left side to fit the pieces together neatly. Repeat on the right side of the hood with the pinning.

Step 3: Once your hood and neck area are all pinned together, you can just use a straight stitch to sew them together.
It leaves a seam showing on the inside of the cloak where you have joined the hood to the cape. This may or may not matter to you.
A quick way to hide this seam if it bothers you is to sew some decorative ribbon over the top.

Here's my daughter showing off the quick hooded cloak I sewed for her. It was made from a thick curtain fabric that I had spare.
🎃 See How to Make the Rest of the Cloak Here
The cloak was great for the costume she needed for school and also has been worn on numerous occasions since with her dressing up as a Hobbit, Elves and even an Anglo Saxon. Making it without a pattern was thankfully not as hard as I anticipated.
Related Content You Should Also Love:
Page Last Updated:


So well done! your DIY talent never ceases to amaze me! And the cape is outstanding of course.
ReplyDeleteThank you, Barbara. Having just a few little DIY skills can save so much money and is especially good for making Halloween costumes like cloaks on the cheap.
Delete