Magnificent Maleficent Perler Bead Pattern
Disney's version of Sleeping Beauty contains one of the most magnificent villains ever created and that is, of course, the complex character Maleficent.
My daughter really enjoyed this movie as well and she was keen on having an easy pattern and design that she could make up by using her fused Perler beads, so I made a Maleficent Perler bead pattern which you can enjoy using too with this simple to follow photo tutorial.
This small design makes a finished project which measures around 2.5 x 2 inches. That is a good size for a bag charm, a necklace pendent, a keychain, an embellishment for a handmade card or gift tag or a large, oversize bracelet charm.
Note: This post may contain affiliate links for which I can be compensated.

I've seen both the traditional 1959 animated version as well as the new and modern telling of the tale that sees the actress Angelina Jolie playing the part of a good fairy who turns very bad.
What You'll Need For This Project

Step 1: Let's start making the Perler bead pattern of Maleficent. You need to use a square shaped pegboard. It doesn't matter if it is a small or a large board except that the design fits better on a smaller board.
If you use a larger square Perler pegboard, you could make more than one design of her and then have them ironed out all at the same time.
The board I am using here is a small yellow one. You can get pegboards that are clear or transparent as well as solid colors. You can place the transparent ones over the top of available patterns. I actually find the solid color boards easier to work with.
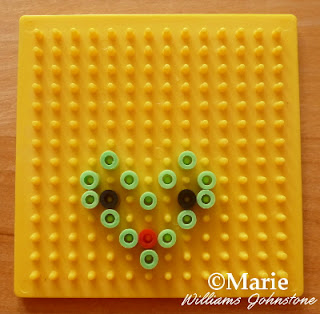
To make this pattern, I find the easiest way to start off is with adding in the red bead for her mouth which, on a small pegboard, is 3 pegs up and 7 pegs across from the left.
Once you have that red bead in as the starting point, you can see that you need to add in 2 black beads for the eyes. Both of these are exactly 2 pegs up diagonally (left and right) from the red bead.

Step 2: This evil character has a face shape that best translates into the shape of a heart when making her from a pixel pattern. That’s because she has a long chin, very angular cheekbones and a horned headpiece that she wears.
You can make her facial skin color in pale green or in white. In the latest movie, she does not have a green face at all. However, many people associate this character with a green face so I prefer to use that color.
I like the fact that this one can be made with a green face as this character appears in the classic movie or a pale white face as in the new one. We’ve tried it both ways and they work just fine.
So starting by putting a green bead right under the red one, work the heart shape outline as shown here on this pegboard. Making this heart shaped outline makes the next step really easy for you.

Step 3: Since you made the outline for the face in the step above, now you just need to fill in that outline with the same color beads.
The whole of the facial area will now be in the same color whether green, white or some other color you fancy for this evil Queen and sorceress. I think yellow would look pretty good too.

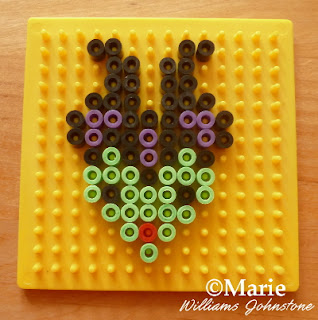
Step 4: Now switch over to using black beads so you can make a start on working the shape of the all-important and iconic horns.
I suggest you first add in the beads over the top of her head before working the pattern of one horn and then the other. This is just making an initial outline for you. You may need to look carefully at the image.

Step 5: You need 8 dark purple beads for the detail on her headpiece. If you don't have purple, you could try gray, gold or silver as an accent color instead.
I like purple because it is heavily associated with the character of this villain. Add them in where they are shown in the photo.

Step 6: Now you just need to add in the rest of the black beads in order to complete the iconic headpiece of this evil sorceress. When you have finished, a responsible adult needs to iron the design using the special ironing paper that is provided in most of the Perler or Hama bead kits.
Always iron projects according to the instructions of the manufacturer which you should be able to find online. The main tip is to use an iron with the steam setting turned off. I hope you've enjoyed reading my justhalloweencrafts page today, thanks for your visit.
Have fun using this completed project to make something cool like a hair accessory, a brooch pin or keychain. It is easy to make jewelry from fused bead designs with just a few extra steps.
Related Content You Should Also Love:
Page Last Updated:
My daughter really enjoyed this movie as well and she was keen on having an easy pattern and design that she could make up by using her fused Perler beads, so I made a Maleficent Perler bead pattern which you can enjoy using too with this simple to follow photo tutorial.
This small design makes a finished project which measures around 2.5 x 2 inches. That is a good size for a bag charm, a necklace pendent, a keychain, an embellishment for a handmade card or gift tag or a large, oversize bracelet charm.
Note: This post may contain affiliate links for which I can be compensated.
Magnificent Maleficent Perler Bead Pattern to Make

I've seen both the traditional 1959 animated version as well as the new and modern telling of the tale that sees the actress Angelina Jolie playing the part of a good fairy who turns very bad.
What You'll Need For This Project
- You'll need Perler beads in black, purple, red and green or white.
- A square fused bead pegboard, a small or a large board.
- Special ironing paper and an adult to iron the completed project.

Step 1: Let's start making the Perler bead pattern of Maleficent. You need to use a square shaped pegboard. It doesn't matter if it is a small or a large board except that the design fits better on a smaller board.
If you use a larger square Perler pegboard, you could make more than one design of her and then have them ironed out all at the same time.
The board I am using here is a small yellow one. You can get pegboards that are clear or transparent as well as solid colors. You can place the transparent ones over the top of available patterns. I actually find the solid color boards easier to work with.
To make this pattern, I find the easiest way to start off is with adding in the red bead for her mouth which, on a small pegboard, is 3 pegs up and 7 pegs across from the left.
Once you have that red bead in as the starting point, you can see that you need to add in 2 black beads for the eyes. Both of these are exactly 2 pegs up diagonally (left and right) from the red bead.

Step 2: This evil character has a face shape that best translates into the shape of a heart when making her from a pixel pattern. That’s because she has a long chin, very angular cheekbones and a horned headpiece that she wears.
You can make her facial skin color in pale green or in white. In the latest movie, she does not have a green face at all. However, many people associate this character with a green face so I prefer to use that color.
I like the fact that this one can be made with a green face as this character appears in the classic movie or a pale white face as in the new one. We’ve tried it both ways and they work just fine.
So starting by putting a green bead right under the red one, work the heart shape outline as shown here on this pegboard. Making this heart shaped outline makes the next step really easy for you.

Step 3: Since you made the outline for the face in the step above, now you just need to fill in that outline with the same color beads.
The whole of the facial area will now be in the same color whether green, white or some other color you fancy for this evil Queen and sorceress. I think yellow would look pretty good too.

Step 4: Now switch over to using black beads so you can make a start on working the shape of the all-important and iconic horns.
I suggest you first add in the beads over the top of her head before working the pattern of one horn and then the other. This is just making an initial outline for you. You may need to look carefully at the image.

Step 5: You need 8 dark purple beads for the detail on her headpiece. If you don't have purple, you could try gray, gold or silver as an accent color instead.
I like purple because it is heavily associated with the character of this villain. Add them in where they are shown in the photo.

Step 6: Now you just need to add in the rest of the black beads in order to complete the iconic headpiece of this evil sorceress. When you have finished, a responsible adult needs to iron the design using the special ironing paper that is provided in most of the Perler or Hama bead kits.
Always iron projects according to the instructions of the manufacturer which you should be able to find online. The main tip is to use an iron with the steam setting turned off. I hope you've enjoyed reading my justhalloweencrafts page today, thanks for your visit.
Have fun using this completed project to make something cool like a hair accessory, a brooch pin or keychain. It is easy to make jewelry from fused bead designs with just a few extra steps.
Related Content You Should Also Love:
More Halloween Perler Bead Patterns
Turn this Design into a Charm for a Loom Band Bracelet
Make a Maleficent Horned Hair Band Costume Accessory
More Crafts for Kids This Halloween
More Spooky Craft Tutorials
Turn this Design into a Charm for a Loom Band Bracelet
Make a Maleficent Horned Hair Band Costume Accessory
More Crafts for Kids This Halloween
More Spooky Craft Tutorials
Page Last Updated:


Comments
Post a Comment
Just Halloween Crafts is a site dedicated to my favorite time of year and the whole spook time season that surrounds October 31st. I love to decorate the home with handmade, DIY and crafted items for Halloween as well as make costume accessories and do fun crafting activities. Using papercrafts, sewing with felt, no-sew techniques and more, you can create a wonderful scheme to your decor whether you are going for scary themes or more fun ones with pumpkins and more. Ghosts, witches, wizards and more make for fun crafting sessions. Thanks for leaving me a comment. Comments do not show until I approve them. Marie