How to Make a Chocolate Spiders Web
Chocolate spider webs are fairly quick to make up and lots of fun too, especially for themed parties and for spooky celebrations such as Halloween. Although you can certainly enjoy eating these just as they are, they do really work much better used as fun and edible decorations.
These chocolate spider webs look great decorating cakes and cupcakes where they can be applied as rather creepy and edible cupcake toppers. You can see a demonstration of that in my photo.
Apart from eating the chocolate spider webs whole or using them as cake toppers, these intricate designs also look good for other desserts and puddings. Use them placed on the top of desserts such as trifle, homemade cheesecakes and chocolate pot puddings too.
Note: This post may contain affiliate links for which I can be compensated.

Chocolate spider webs are really not difficult to make once you understand the process. If you've never actually done any piping or icing before, or if you struggle to use icing bags, then look to get some decorating bottles.
You can get purpose made decorating bottles that you can fill with the melted chocolate instead to ice with. Here's how to make a cobweb out of yummy chocolate.
Materials and Tools:
Instructions on How to Make Chocolate Spider Webs:
Step 1: First you need to melt down a large bar of cooking or baking chocolate. You can use an ordinary bar but this is much harder to melt without burning it which is why I always use the baking variety instead.
You can melt it down on a stove using what is known as a double boiler technique where you place a bowl or suitable container over a pan with a small amount of boiling water. The steam coming off the simmering water will melt the pieces in the bowl. Make sure the bowl is not plastic.

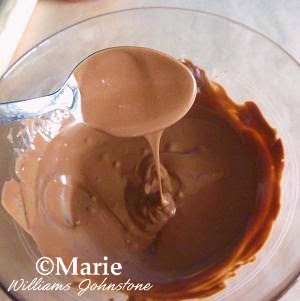
Melt your chocolate - yum!
Personally this is can be time consuming to set up well and do so I prefer to use the microwave. Just break up the bar into chunks and place them into a microwave bowl.
Pop this into the microwave and zap for short 20 second bursts until almost melted. When it has nearly all melted, you stir the mixture fast to get a smooth and thick consistency to it.

Pipe the melted chocolate. I using icing bottles.
Step 2: Next you need a method to pipe or ice the melted mixture. I would recommend sticking to the technique that you're already familiar with. If you've never iced before then I recommend trying some icing bottles which are pretty easy for beginners to use.
I prefer my microwavable bottles for this technique because often the chocolate will start to harden up again before I finish, so I just take the top off and zap the bottle very quickly in the microwave again to remelt it all.

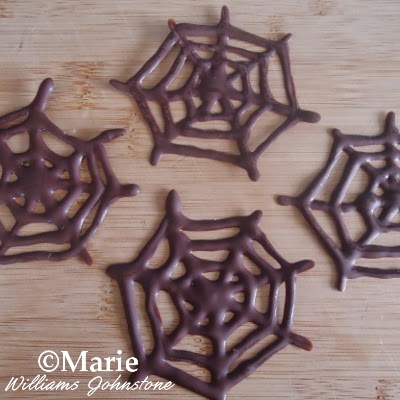
Spiderweb shapes made from chocolate.
Step 3: You need a good sized length of parchment paper or baking paper on top of your work counter or space. You should place it on top of a tray to protect your surface.
Pipe your spiderweb shapes straight on top of the paper - I explain how I do this below. I like to use a straight icing bottle which I don't even need to squeeze since the chocolate just pours out of the nozzle.
Step 4: A quick and easy way to ice a spiderweb or cobweb shape is to make an X at the overall size that you want. Add in 2 or 3 more lines branching out of the middle to make the rough framework for the shape.
Step 5: Now you should have 7 or 8 lines working out from a central point. Pipe some rough circle shapes starting near the mid point of your original X. You can make these circles rounded or you can make them look straighter and more like hexagonal shapes. Either way works just fine.
Step 6: Allow the chocolate to harden in a cool place and then carefully peel the shapes away from the parchment paper. To store them for a while you can stack them up on the parchment paper in a covered container and keep them in the refrigerator to stay cool.
I hope you've enjoyed reading my justhalloweencrafts page today, thanks for your visit. Use as cool cupcake or dessert toppers for Halloween or themed spooky parties.
Related Content You Should Also Love
Page Last Updated:
These chocolate spider webs look great decorating cakes and cupcakes where they can be applied as rather creepy and edible cupcake toppers. You can see a demonstration of that in my photo.
Apart from eating the chocolate spider webs whole or using them as cake toppers, these intricate designs also look good for other desserts and puddings. Use them placed on the top of desserts such as trifle, homemade cheesecakes and chocolate pot puddings too.
Note: This post may contain affiliate links for which I can be compensated.
How to Make a Chocolate Spiders Web Step by Step Instructions

Chocolate spider webs are really not difficult to make once you understand the process. If you've never actually done any piping or icing before, or if you struggle to use icing bags, then look to get some decorating bottles.
You can get purpose made decorating bottles that you can fill with the melted chocolate instead to ice with. Here's how to make a cobweb out of yummy chocolate.
Materials and Tools:
- 1 bar baking / cooking chocolate
- Parchment or Baking Paper
- Piping Bottle or Bag
- Microwavable Bowl and Microwave
Instructions on How to Make Chocolate Spider Webs:
Step 1: First you need to melt down a large bar of cooking or baking chocolate. You can use an ordinary bar but this is much harder to melt without burning it which is why I always use the baking variety instead.
You can melt it down on a stove using what is known as a double boiler technique where you place a bowl or suitable container over a pan with a small amount of boiling water. The steam coming off the simmering water will melt the pieces in the bowl. Make sure the bowl is not plastic.

Melt your chocolate - yum!
Personally this is can be time consuming to set up well and do so I prefer to use the microwave. Just break up the bar into chunks and place them into a microwave bowl.
Pop this into the microwave and zap for short 20 second bursts until almost melted. When it has nearly all melted, you stir the mixture fast to get a smooth and thick consistency to it.

Pipe the melted chocolate. I using icing bottles.
Step 2: Next you need a method to pipe or ice the melted mixture. I would recommend sticking to the technique that you're already familiar with. If you've never iced before then I recommend trying some icing bottles which are pretty easy for beginners to use.
I prefer my microwavable bottles for this technique because often the chocolate will start to harden up again before I finish, so I just take the top off and zap the bottle very quickly in the microwave again to remelt it all.

Spiderweb shapes made from chocolate.
Step 3: You need a good sized length of parchment paper or baking paper on top of your work counter or space. You should place it on top of a tray to protect your surface.
Pipe your spiderweb shapes straight on top of the paper - I explain how I do this below. I like to use a straight icing bottle which I don't even need to squeeze since the chocolate just pours out of the nozzle.
Step 4: A quick and easy way to ice a spiderweb or cobweb shape is to make an X at the overall size that you want. Add in 2 or 3 more lines branching out of the middle to make the rough framework for the shape.
Step 5: Now you should have 7 or 8 lines working out from a central point. Pipe some rough circle shapes starting near the mid point of your original X. You can make these circles rounded or you can make them look straighter and more like hexagonal shapes. Either way works just fine.
Step 6: Allow the chocolate to harden in a cool place and then carefully peel the shapes away from the parchment paper. To store them for a while you can stack them up on the parchment paper in a covered container and keep them in the refrigerator to stay cool.
I hope you've enjoyed reading my justhalloweencrafts page today, thanks for your visit. Use as cool cupcake or dessert toppers for Halloween or themed spooky parties.
Related Content You Should Also Love
See How You Can Use This Web to Make Cool Spider Cupcakes
Make Cute Spider Pom Pom Halloween Decorations
Spider Web Paper Craft for Kids
More on Spider Crafts
More Halloween Food and Recipes
Make Cute Spider Pom Pom Halloween Decorations
Spider Web Paper Craft for Kids
More on Spider Crafts
More Halloween Food and Recipes
Page Last Updated:


Comments
Post a Comment
Just Halloween Crafts is a site dedicated to my favorite time of year and the whole spook time season that surrounds October 31st. I love to decorate the home with handmade, DIY and crafted items for Halloween as well as make costume accessories and do fun crafting activities. Using papercrafts, sewing with felt, no-sew techniques and more, you can create a wonderful scheme to your decor whether you are going for scary themes or more fun ones with pumpkins and more. Ghosts, witches, wizards and more make for fun crafting sessions. Thanks for leaving me a comment. Comments do not show until I approve them. Marie