Maleficent Rainbow Loom Bands Bracelet Tutorial
This detailed photo tutorial is going to show you how to make your own Disney villain inspired bracelet with a real Maleficent evil fairy theme from Sleeping Beauty. The fun rubber band bracelet design combines two cool crafts that both adults and kids can enjoy by using Rainbow Loom bands and fused Perler or Hama Beads.
The colored rubber bands make up really a nice stretchy wrist bracelet to wear and the beads are used to create a large charm that resembles the evil Queen Maleficent's face. Or you can also make a longer pattern with the bands to make up a necklace or something else like a keychain instead.
This is a great craft opportunity for both adults and children to work together on a project with something that is fun to make and fairly easy. My daughter and I really had fun making this and she loved wearing it when she dressed up as this character for Halloween. Enjoy the tutorial.
Note: This post may contain affiliate links for which I can be compensated.

What You'll Need For This Maleficent Rainbow Loom Bands Craft:
If you are already very familiar with making rubber band bracelets and jewelry, you might want to apply the Maleficent color scheme to your favorite loom pattern instead of using my suggestion. Be creative and find other fun patterns that work with the charm.
However, if you're still new or inexperienced with the Rainbow Loom craft, I made a beginner friendly bracelet tutorial on making a simple fishtail design which is the exact loom pattern used in this project.
🎃 Beginner Bracelet Tutorial Here on My CraftyMarie Site
This easy tutorial means you can use either a standard loom board, the new Monster Tail or even your fingers if you are used to twisting the bands around your own digits. It has complete instructions as well as photos and videos to follow.

Step 1: To really get the right look and styling for this iconic Disney villain, you need to use the colors which people associate most with her character. I used mostly black since she wears a lot of that color with her headpiece and long, sweeping robes. Then I added in just enough purple and pale green to get the balance of colors just right.
I chose a simple double fishtail pattern for my Maleficent design. This is easy enough for beginners as well as looking cool enough to impress with the finished result. The link to that exact tutorial is above if you should need it. Alternatively you can use a rainbow loom pattern of your choosing.
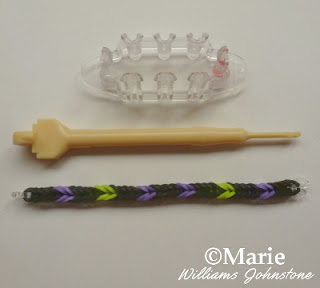
As you can see from my photo, you only need 2 pegs (or even 2 fingers) to create this fishtail pattern. That means you can use the middle pegs on a Monster Tail (shown left in the photo) or two outer pegs on a standard board.

Step 2: If you've never made the double fishtail before, I advise trying it out with any choice of colors so you can really understand how it works. It is a very easy pattern and very repetitive which makes it simple to learn. So do practice first before trying out the color scheme for this particular design.
In order to make your completed design with exactly the same pattern as mine, you need to follow the double fishtail pattern, adding in the colors and quantity of rubber bands in this order.
4 black, 2 purple, 4 black, 2 green, 4 black, 2 purple, 4 black, 2 purple, 4 black, 2 green, 4 black, 2 purple, 4 black.
Once finished your bracelet should fit a child's wrist (approx 6+) up to a very petite adult sized wrist. If you need to get a smaller fit, then you remove some bands from the start and end of the pattern. To get a larger fit, you need to add some more bands in to the design. Use an S shaped clip or a C shaped clip to fasten the ends of the bracelet together and stop them from unraveling.

Step 3: Now you have your stretchy rubber bracelet and the next part is to make the Perler bead charm for it. There is a complete photo tutorial to make the Maleficent face charm here. Of course, you can use your own design instead if you want to.
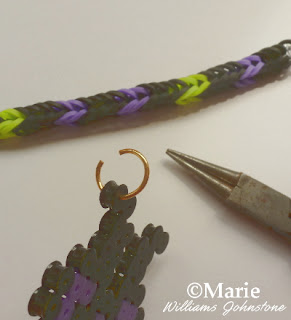
Next, gather all that you need for attaching your completed bead charm to your bracelet or other piece of jewelry. You need an open jump ring - that is the gold color ring in the photo - and it needs to be approx 8 - 10 mm in size.
You might need to use a pair of small pliers or jewelry pliers depending on how hard it is to manipulate the metal of the jump ring.

Step 4: This is where you may need to use some small pliers or even a strong pair of tweezers. You need to open up the split ends of the jump ring wide enough so that you can poke one end through the top left horn as shown in the photograph.
Fused beads like Perler and Hama have some very convenient holes that you can make use of providing you haven't ironed the holes out completely - although there is always a workaround.
If the hole in the horn area of the charm is not large enough for the jump ring to push through, find a sharp point such as a blunt tipped darning needle or a very fine pointed tweezer edge to push into the area and make the hole bigger. Then push the jump ring through.

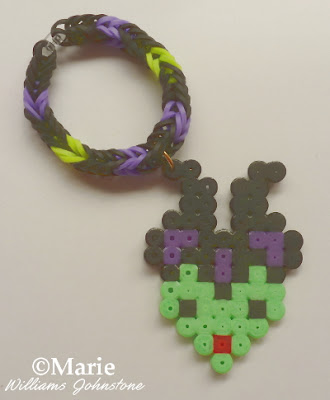
Step 5: Once you have the bead charm on the open jump ring, then you need to leave this ring open and insert one end somewhere through the middle of your loom band bracelet as shown in the photo.
Normally an open jump ring sized from 8 - 10 mm will be large enough for this but you might need to use a different size if you have a thicker piece of jewelry. Close up the ends of the jump ring using either your fingers or some pliers.

Step 6: Here is the finished band and bead charm bracelet so you can see what yours should look like if you also stuck to the same pattern and colors. I bet your finished version will look just as good if not better.
I hope you've enjoyed reading my justhalloweencrafts page today, thanks for your visit. You can see a photo of this piece of jewelry being worn below which gives you an idea of how the villain's face hangs from the wrist section.

Once you've made up one piece of jewelry, you can take the same skills and apply them to making up a bracelet using a different color scheme and a different charm too.
Related Content You Should Also Love
Page Last Updated:
The colored rubber bands make up really a nice stretchy wrist bracelet to wear and the beads are used to create a large charm that resembles the evil Queen Maleficent's face. Or you can also make a longer pattern with the bands to make up a necklace or something else like a keychain instead.
This is a great craft opportunity for both adults and children to work together on a project with something that is fun to make and fairly easy. My daughter and I really had fun making this and she loved wearing it when she dressed up as this character for Halloween. Enjoy the tutorial.
Note: This post may contain affiliate links for which I can be compensated.
Maleficent Rainbow Loom Bands Bracelet Tutorial: Make This Cute Jewelry

What You'll Need For This Maleficent Rainbow Loom Bands Craft:
- Rainbow Loom bands in black, pale green and purple. I used 28 black, 8 purple, 4 green for a large child sized or small adult wrist.
- 1 C or S shaped clip which fastens the ends of the bands together.
- A Monster Tail Loom, a Rainbow Loom board or Fingers.
- Perler beads in black, purple, red and pale green.
- A square pegboard for the fused beads.
- The special ironing paper for an adult to iron the beads together.
- An open jump ring (8-10mm) and possibly a small pair of pliers.
The Maleficent Rainbow Loom Bands Bracelet Tutorial
If you are already very familiar with making rubber band bracelets and jewelry, you might want to apply the Maleficent color scheme to your favorite loom pattern instead of using my suggestion. Be creative and find other fun patterns that work with the charm.
However, if you're still new or inexperienced with the Rainbow Loom craft, I made a beginner friendly bracelet tutorial on making a simple fishtail design which is the exact loom pattern used in this project.
🎃 Beginner Bracelet Tutorial Here on My CraftyMarie Site
This easy tutorial means you can use either a standard loom board, the new Monster Tail or even your fingers if you are used to twisting the bands around your own digits. It has complete instructions as well as photos and videos to follow.

Step 1: To really get the right look and styling for this iconic Disney villain, you need to use the colors which people associate most with her character. I used mostly black since she wears a lot of that color with her headpiece and long, sweeping robes. Then I added in just enough purple and pale green to get the balance of colors just right.
I chose a simple double fishtail pattern for my Maleficent design. This is easy enough for beginners as well as looking cool enough to impress with the finished result. The link to that exact tutorial is above if you should need it. Alternatively you can use a rainbow loom pattern of your choosing.
As you can see from my photo, you only need 2 pegs (or even 2 fingers) to create this fishtail pattern. That means you can use the middle pegs on a Monster Tail (shown left in the photo) or two outer pegs on a standard board.

Step 2: If you've never made the double fishtail before, I advise trying it out with any choice of colors so you can really understand how it works. It is a very easy pattern and very repetitive which makes it simple to learn. So do practice first before trying out the color scheme for this particular design.
In order to make your completed design with exactly the same pattern as mine, you need to follow the double fishtail pattern, adding in the colors and quantity of rubber bands in this order.
4 black, 2 purple, 4 black, 2 green, 4 black, 2 purple, 4 black, 2 purple, 4 black, 2 green, 4 black, 2 purple, 4 black.
Once finished your bracelet should fit a child's wrist (approx 6+) up to a very petite adult sized wrist. If you need to get a smaller fit, then you remove some bands from the start and end of the pattern. To get a larger fit, you need to add some more bands in to the design. Use an S shaped clip or a C shaped clip to fasten the ends of the bracelet together and stop them from unraveling.

Step 3: Now you have your stretchy rubber bracelet and the next part is to make the Perler bead charm for it. There is a complete photo tutorial to make the Maleficent face charm here. Of course, you can use your own design instead if you want to.
Next, gather all that you need for attaching your completed bead charm to your bracelet or other piece of jewelry. You need an open jump ring - that is the gold color ring in the photo - and it needs to be approx 8 - 10 mm in size.
You might need to use a pair of small pliers or jewelry pliers depending on how hard it is to manipulate the metal of the jump ring.

Step 4: This is where you may need to use some small pliers or even a strong pair of tweezers. You need to open up the split ends of the jump ring wide enough so that you can poke one end through the top left horn as shown in the photograph.
Fused beads like Perler and Hama have some very convenient holes that you can make use of providing you haven't ironed the holes out completely - although there is always a workaround.
If the hole in the horn area of the charm is not large enough for the jump ring to push through, find a sharp point such as a blunt tipped darning needle or a very fine pointed tweezer edge to push into the area and make the hole bigger. Then push the jump ring through.

Step 5: Once you have the bead charm on the open jump ring, then you need to leave this ring open and insert one end somewhere through the middle of your loom band bracelet as shown in the photo.
Normally an open jump ring sized from 8 - 10 mm will be large enough for this but you might need to use a different size if you have a thicker piece of jewelry. Close up the ends of the jump ring using either your fingers or some pliers.

Step 6: Here is the finished band and bead charm bracelet so you can see what yours should look like if you also stuck to the same pattern and colors. I bet your finished version will look just as good if not better.
I hope you've enjoyed reading my justhalloweencrafts page today, thanks for your visit. You can see a photo of this piece of jewelry being worn below which gives you an idea of how the villain's face hangs from the wrist section.

Once you've made up one piece of jewelry, you can take the same skills and apply them to making up a bracelet using a different color scheme and a different charm too.
Related Content You Should Also Love
Make a Beaded Loom Bands Bracelet
Create a Maleficent Horned Headband for a Costume or Party
Maleficent Perler Hama Beads Pattern
More Halloween Crafts for Kids
More on Witches
Create a Maleficent Horned Headband for a Costume or Party
Maleficent Perler Hama Beads Pattern
More Halloween Crafts for Kids
More on Witches
Page Last Updated:


Comments
Post a Comment
Just Halloween Crafts is a site dedicated to my favorite time of year and the whole spook time season that surrounds October 31st. I love to decorate the home with handmade, DIY and crafted items for Halloween as well as make costume accessories and do fun crafting activities. Using papercrafts, sewing with felt, no-sew techniques and more, you can create a wonderful scheme to your decor whether you are going for scary themes or more fun ones with pumpkins and more. Ghosts, witches, wizards and more make for fun crafting sessions. Thanks for leaving me a comment. Comments do not show until I approve them. Marie