How to Make a Pumpkin Fairy House Craft
This post contains affiliate links. If you buy through them, the site may earn a small commission at no extra cost to you. Disclosure.
Quick answer: to carve a pumpkin fairy house, hollow out a pumpkin through a large lid (the lid becomes the roof), draw a round door and two windows with a washable marker, cut the windows right through, cut the door out in one piece and prop it below the opening as steps, then add carved or drawn details around the door and light it from inside.
Let me show you step by step how to make a pumpkin fairy house craft for Halloween. Carving a cute fairytale home from a pumpkin is quite easy to do and looks so effective for a fantasy theme.
This year I wanted a fantasy theme for my pumpkin decoration so I carved and decorated a design that any one into Harry Potter, Hobbits and Lord of the Rings or any other fantasy is sure to love.
There are loads of photographs to take you through how I made this design from hollowing the pumpkin out to carving it and decorating. Included are lots of tips on getting the complete fantasy look that was wanted too.
Note: This post may contain affiliate links for which I can be compensated.
How to Make a Pumpkin Fairy House: Carve a Magical Scene for Halloween
What You Will Need to Make a Pumpkin Fairy House
1: A hollowed out pumpkin with a lid (tutorial provided)
2: A non permanent marker pen
3: Pumpkin carving tools or a sharp knife
4: A black Sharpie pen
5: Toothpicks
6: Glitter glue (optional)
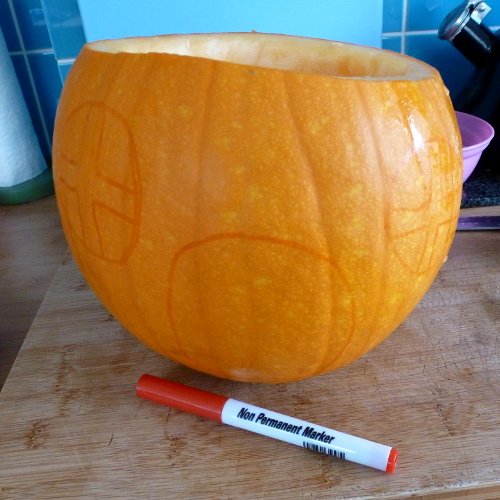
Step 1: Start by hollowing out your pumpkin. For this pumpkin carving fairy house, it is important that you cut off a lid top for the pumpkin before you start to hollow it out.
The lid forms the roof of the fairy home when completed so it needs to be in one complete piece. A large lid will look better than a very tiny one. The tutorial linked to above explains how to remove the lid.
A non permanent marker pen allows you to draw out a rough design for your fairy house before you start carving it. Red is a great color because it is dark enough for you to see but not too dark that it will mark the finished design. Either way, you should be able to rub any lines off when you're done.
Start by drawing out a rough round door shape bottom middle of your pumpkin. Either side of the door draw out two large windows. I made round windows with thick cross bars in the middle.
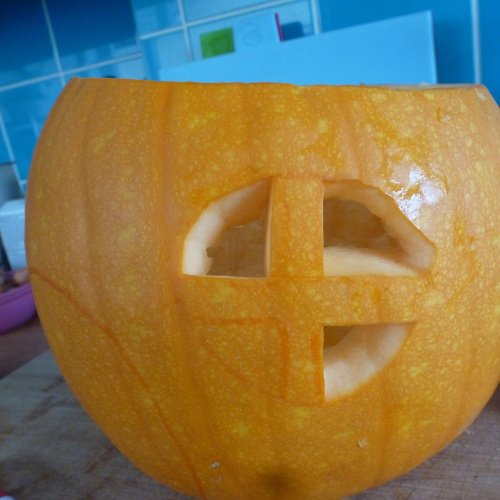
Step 2: Carefully cut out the window sections. I used a small, sharp knife which is what I'm used to using but you may want to use special pumpkin carving tools instead.
An easier version is to simply cut out circles for the windows but this won't look as good when the pumpkin is lit up from the inside. So I cut out quarter circles to give the appearance of having bars between. You need to cut right through the flesh.
If you've never cut designs into a pumpkin before, I'd urge you to practice on one first because it is very easy to make mistakes, even when following the lines you've marked out with a pen.
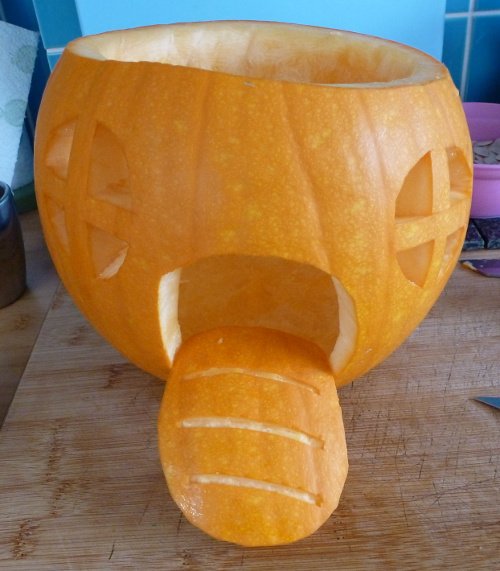
Step 3: This photo now shows the completed windows which have been carved on either side of the door. You can rub away the pen markings from around the windows once they are complete.
To make the door, I completely cut out a large oval shape. You need this section to be cut whole so that you can prop it up against the finished fairy pumpkin and give it the look of steps climbing up into the house.
This door section is attached using toothpicks which have been cut down in half or smaller. Stick them into the bottom of the open door and then fasten on the door section so it is pressed down over the sharp ended picks. For now, you can either draw or carve some lines to give the look of steps running across horizontally on the oval door section.
I only carved down to the white pith of the fruit. I did this by scoring out the lines with a sharp knife and then carefully peeling away the top orange layer of skin to reveal the pith. Once done, move this out of the way until later.
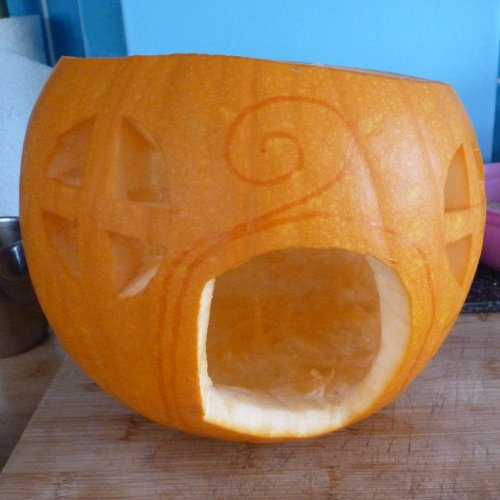
Step 4: I drew some detail around the fairy door area with a non permanent marker pen. I decided to carve into this but it is fiddly and you may wish to decorate some other way.
Options can include drawing over the detail with a Sharpie, a metallic pen, glitter glue or gluing sequins around it. You could also use push pins.
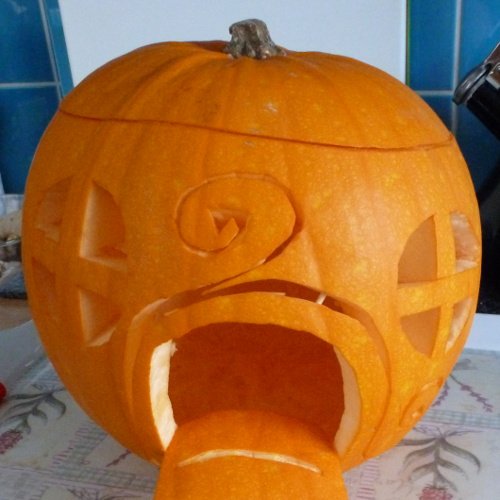
Step 5: This photo shows the detail area I carved out around the fairy door. This was fiddly to do but I knew it would look good when the pumpkin was lit up.
You can make this easier by either decorating the pattern using the suggestions in step 4 or just cutting down into the white pith instead of cutting all the way through.
Once I cut around the door area, I needed to push wooden toothpicks through between the door and the rest of the pumpkin to hold that in place well. You can just about see some of the wooden pick on the right side if the door frame. Toothpicks are very handy for securing sections of your carved pumpkin.
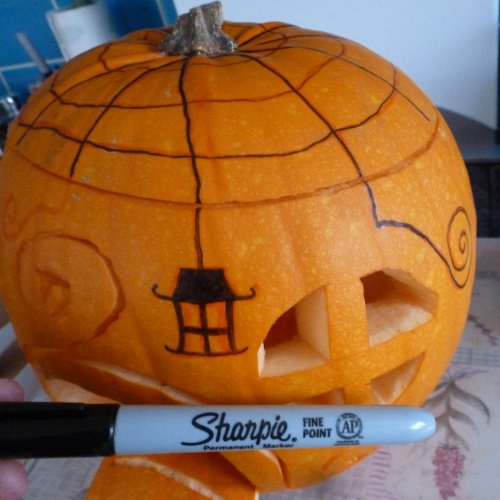
Step 6: Once you have all the main parts carved out that you want (and you can add much more than I have) then you can start drawing on some detail.
I start by sketching out the design I want using a non permanent marker pen and then when happy, I go over the lines with a black Sharpie marker.
I drew out a spiderweb pattern all over the pumpkin lid and then added in some swirls and a hanging lantern design for detail. These parts will look good during the day but will not show up well when the pumpkin is in the dark.
It helps to have a good combination of sections that are cut and will allow the candle light through and sections that look good during daylight.
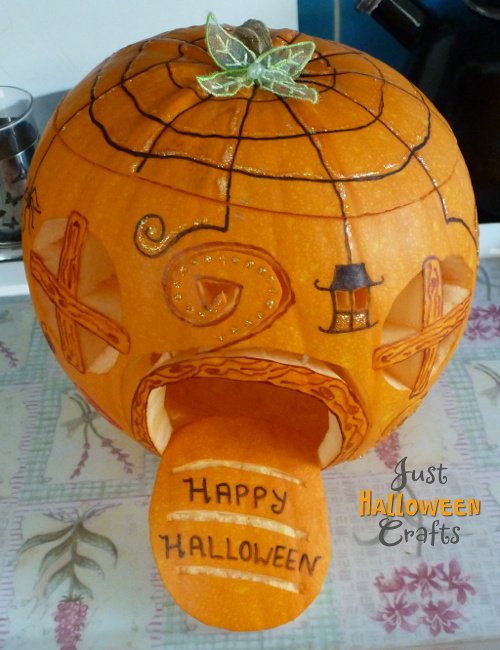
Step 7: More detail has been added using Sharpie marker pens. I drew around the door frame and inside the windows to give the look of wood.
Glitter has been added with Stickles glitter glue. Stickles is the best quality glitter glue that I have ever used. It has a fine nib for application and really sparkles much better than cheaper glitter glues do - and I've tested out a lot over the years.
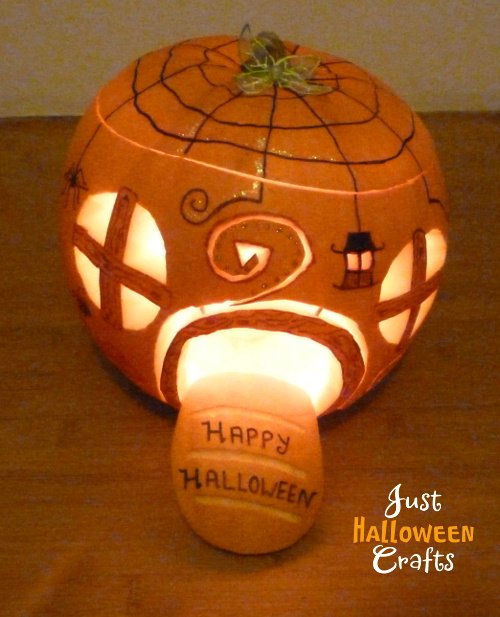
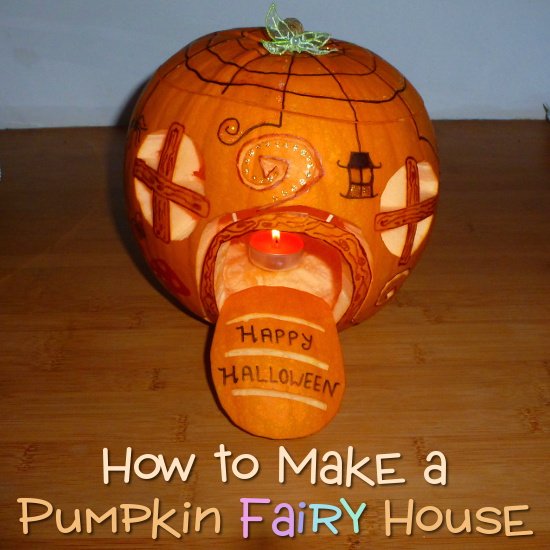
This is what mine looked like when it was lit up from the inside with a tealight candle. You can use flameless candles if you are concerned about safety.
You can see how all the carved sections are nicely lit up with a yellow glow. The glitter looked really good in real life and was picked up by the candlelight. You cannot appreciate that so well with a photo.
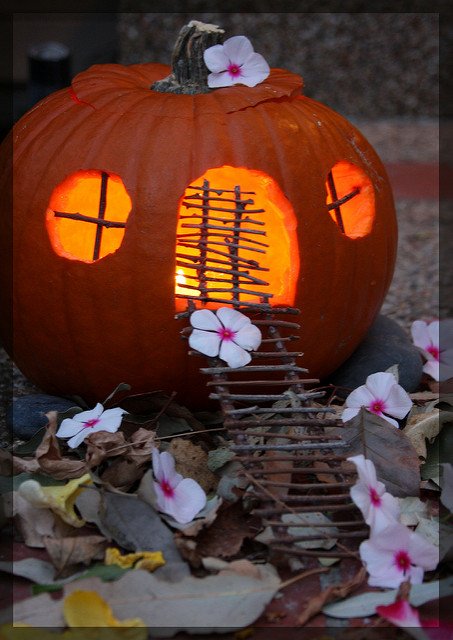
Image Credit: Shared by tinyfroglet on Flickr with a CC License
This is a simpler fairy home design which features easy to carve round windows and a curved door. These have been inset with little twigs which adds some brilliant detailing and looks fantastically cute. I hope you enjoyed the inspiration for making your own magical little home today.
Related Content You Should Also Love:
Make a Pumpkin Trick or Treat Bag
How to Make a Halloween Fairy Door Craft
More DIY Decorations to Enjoy
Pumpkin Fairy House Carving Tips
Updated October 2026: carving tips, design ideas and FAQ added by the Just Halloween Crafts team.
- Cut through or score? Cut right through the flesh for windows and the doorway so light shines out. For brickwork, vines and the door frame, only peel away the orange skin to the pale layer underneath. Scored areas glow softly when the pumpkin is lit and are much easier than fine cut-outs.
- Use the right tools: a small serrated pumpkin saw cuts curves more safely than a kitchen knife, and a clay loop tool or a lino cutter is ideal for scoring thin lines.
- Work from the center out: cut the door and windows first, then the small details, so you're not pressing on fragile areas you've already carved.
- Pick a tall pumpkin: a pumpkin that is taller than it is wide looks more like a cottage and leaves room for a door with windows on either side.
Pumpkin carving is a job for an adult or an older child with supervision. Younger children can draw the design and decorate the finished house with glitter glue, pins or stickers.
Drawing Your Fairy House Design
Draw the whole design on the pumpkin before you cut anything, using a washable marker so mistakes wipe off. Start with the door at the bottom center, then add the windows level with the top of the door, then the decoration. Good details to draw include:
- A stone path or stepping stones running down from the door
- Bricks or stones around the door frame
- Climbing vines and leaves around the windows
- Shutters, a tiny chimney near the stem, or a round attic window above the door
If you'd rather not carve at all, draw the same design with a black paint pen, or see our no-carve pumpkin decorating ideas.
Make Your Fairy House Last
Carved pumpkins soften and mold within days, so carve your fairy house no more than a few days before you want to show it off. Our guide on how to make a carved pumpkin last longer explains cleaning, sealing the cut edges and storage. Light it with battery LED candles or fairy lights: they're safer than a flame and don't cook the pumpkin from the inside. If you need help with the first step, see our tutorial on how to hollow out a pumpkin.
Pumpkin Fairy House FAQ
What tools do you need to carve a pumpkin fairy house?
You need a large spoon or scoop to hollow the pumpkin, a washable marker for the design, a small serrated pumpkin saw or a small sharp knife for cutting through, and a loop tool or lino cutter for scoring details. Toothpicks hold the door in place as steps.
How do you make the fairy house door?
Cut the door out in one whole piece, score lines across it to look like steps, then push half toothpicks into the bottom of the doorway and press the door piece onto them so it leans out like a little staircase.
Can kids make a pumpkin fairy house?
Children can draw the design and decorate the house with glitter glue, sequins, push pins or stickers, while an adult does the cutting. For a no-knife version, paint or draw the door and windows instead of carving them.